Congratulations to Steve of South Jersey on an incredibly Successful well. Steve drilled 60 feet and reports his well produces a whopping 75 Gallons Per Minute (GPM). Yikes!
Forgive me for repeating myself because I know I have said this in other places on the website but some (if not most) of the most significant techniques for well drilling have come from the users of this site. When the site started in 2010, I posted a rudimentary shallow well drilling technique. Since then, YOU, the users of this site have sent in many refinements and improvements. Thank you. And thank you Steve! Steve’s 30 foot well screen, his use of belled conduit, and using air to develop the well are all excellent examples of this.
Steve used a mud pump with a portable mud pit to drill his well. He used a PVC drill bit that he furnished pictures of after drilling. Take a look. They show minimal wear after drilling a 60 foot well. Don’t expect this! I have worn one down to the nub in ten feet. But then again, Steve is obviously pretty good at this!
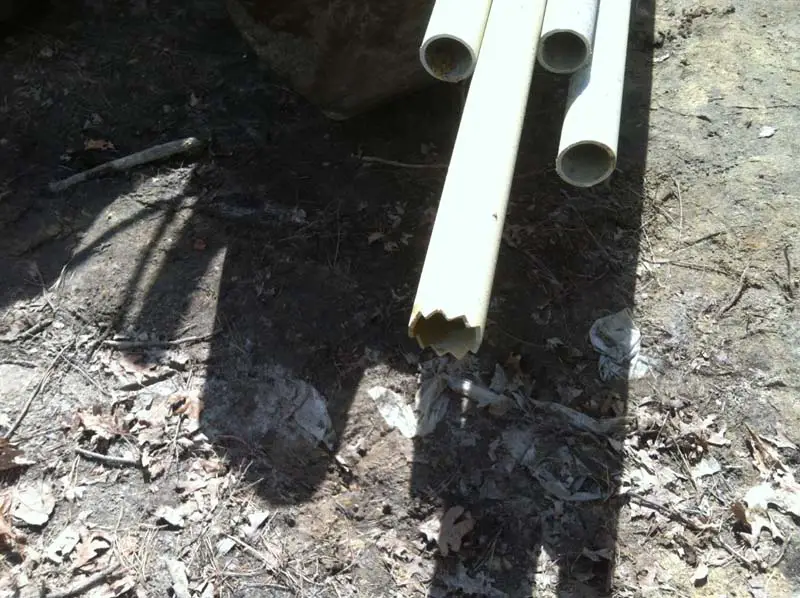
PVC USED TO DRILL WELL
Steve used an interesting method to test pump and develop his well. He ran an air line from a compressor all the way to the bottom of his well screen. The bubbles brought up the water from the bottom of the well. They did a pretty good job of it too!
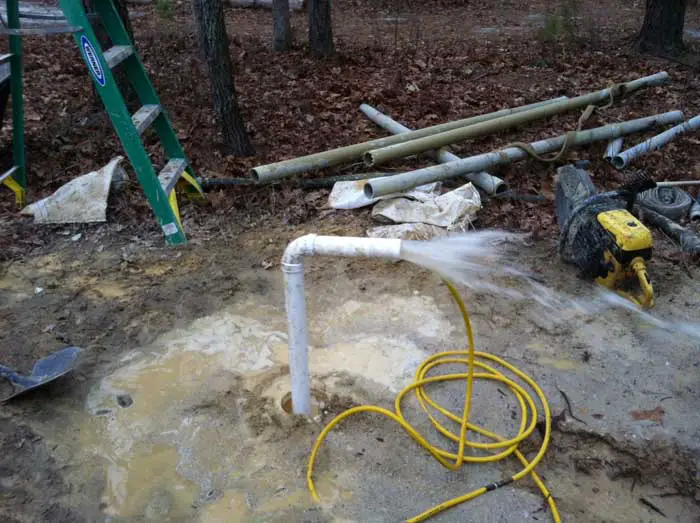
PUMPING WELL WITH COMPRESSED AIR LINE
Steve needed to irrigate five acres. He needed a well that could really produce. He put in 30 feet of two inch well screen. This is one heck of a well screen!
Let’s think about how that compares with a typical four foot long 1.25 inch well screen for a minute. This will give us an idea of how his well is so incredibly productive.
The formula to calculate the circumference of a circle is pi times the diameter. Pi is 3.1416 (rounded to the fourth decimal). So 1.25 times 3.1416 equals a circumference of 3.895584. Take that times the length of a four foot long well screen – 1.9635 X 48 inches = 186.98 square inches of screen.
Now lets tackle the 30 foot long 2 inch screen. The 2 inch diameter times pi yields a circumference of 6.2832 inches. Then multiply that times 30 feet or 360 inches which gives us 2261.95 square inches of well screen.
Steve measured the output of his well by filling a five gallon bucket in four seconds. That is 75 gallons per minute. Sheesh!
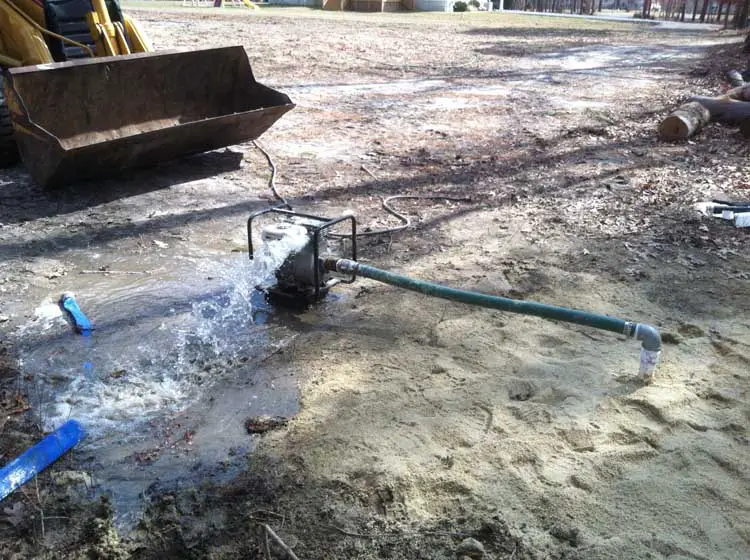
PUMPING WELL WITH MUD PUMP – 75 GALLONS PER MINUTE!!
Steve reports he started drilling at 9am and was at 60 feet deep by 2pm. He had the well cased, gravel packed, and cleaned by 4pm. How’s that for efficiency?
CONDUIT vs. COUPLINGS – Steve suggests the use of conduit with “belled” ends instead of couplings to increase the strength of the drillpipe. Conduit and some of the longer sticks of PVC have belled ends which are built in couplers. They are designed so one stick fits (and glues) right into the next.
BELLED END
Steve was kind enough to send us a complete description of his drilling process so here it is:
Hi Mike,
I wanted to follow up with a complete description on how I installed a very successful well using your methods. Hopefully I will not ramble on but I do have a lot of info I’d like to share.
I’ll give you a little history on why I decided to drill a well and share some of my previous attempts before I came upon your website. I’ve always been interested in irrigation and well drilling. I also have been growing Christmas Trees for 20 years. I could never understand planting expensive seedlings and not being able to irrigate them. I have a farm in another location that has a well that was professionally done. My grandfather had a small vegetable farm there and the well was installed years ago. Three years ago My wife and I purchased a home on 5 acres and I plan on establishing a tree farm there. Before I do that I wanted to make sure I will be able to irrigate.
I decided I wanted to try and drill my own well because I like doing things myself and I also wanted to try and save some money. Unfortunately due to a couple of failures I don’t think I saved much money but I did finally do it myself ! I wish I would of come upon your method first! I’m not trying to criticize the other methods I tried but they didn’t work for me. Like just about everyone these days I got most of my information on the internet. My first attempt at well drilling I tried a method I found on the drill a well in your backyard website. This process involved a air powered drill and a complicated set up of water and air lines. I ended up spending a bunch of money and no well. I was plagued with cave-ins and clogged equipment. It seemed like a good idea but it was a disaster for me. My second attempt was to drive a steel well point. I purchased a 2″ well point and 60′ of galvanized 2″ pipe (not cheep!). I managed to drive the well point to 55′ before I got it really stuck in something very hard.The well actually works but it doesn’t produce much more than a pitching pump can handle, obviously not a viable irrigation well. I think the two main problems with the sand point are a limited amount of well screen,and you really have no idea what you are driving it thru. So after my first two attempts I had no well. I had to let a year pass before I tried again, I had to let my wife cool off about all the money I spent before I could try again! So in the meantime I did a lot of research, came upon your website,liked what I saw and decided to try it. One of the main things that appealed to me was your method allows for a temporary casing while you drill. Due to my past experience with cave-ins I really liked this. Now that you have my long winded history I’d like to explain step by step how I used your method to drill a extremely productive well.
I decided on a 2″ well and I would use the mud pump with a portable mud pit. I wanted a lot of well screen to get the production I was looking for. I found 2″PVC well screen ( the kind with blue points) on amazon. I bought 6 five foot sections for a total of 30′. I simply cut the points off of the five sections and glued them together using inside couplings purchased from the same supplier. I made 3 ten foot sections before starting drilling. I also purchased 3 ten foot sections of solid schedule 40 PVC. I was attempting a 60′ deep well.
Next I needed the supplies for the drill stem. I wanted to drill with 3″ schedule 40 PVC. This is where I made a minor change to your method. One thing I did find useful on the drill a well in your backyard website is the recommendation to never use couplings in the well. They tend to be weak and bulky. So what I did was purchase 10′ sections of schedule 40 electrical conduit from Lowes. It really wasn’t much more expensive than regular PVC by the time you buy the pipe and couplings. The electrical conduit has bell ends that are deep and you really get a good smooth connection.
I borrowed a 2″ mud pump and used a large concrete mixing pan for my mud pit. I also purchased 100 lbs. of super gel-x bentonite from a local well drilling supply house. Next following your advice on drilling 10′ deeper I installed a 6″ PVC guide tube. Instead of washing the guide tube down I used a hand auger that I found in my grandfathers garage. I managed to auger about 13′ before the water and sand got ahead of me. I lowered the 6″ pipe in hole and installed a 6″ by 4″ tee on top. I attached roughly a 5′ section of 4″ pipe to guide cuttings and drilling fluid into my mud pit. Now that all this prep is done lets get to the drilling!One thing I highly recommend is finding a helper. I thought about doing it myself but I’m really glad I had help. So now that I already have 13′ of well secured I glued the first 2 pieces of 3″ drilling stem together. One other helpful hint. I was concerned with the PVC glue not having enough time to set up so I not only glued fittings I also screwed them with self tapping screws. This way you don’t have to worry about anything coming apart down the well. Just be careful you use short screws so they don’t interfere when you have to lower your well casing. Another nice thing about using pipe with bell ends ( the bell ends are up) you can make a easy connection at the drill head. All that I did was use a short piece of 3″ pipe reduced it to 2″ added a couple of 2″ elbows and attached it to my discharge hose. The stub of 3″ pipe slides right into your bell at the top of your drill stem. I used a couple of screws and you have a nice leak free connection that you can easily remove when you are ready to add your next section of drill stem. One thing I learned is add a little pipe lubricant to 3″ pipe. this will make it much easier to remove when adding drill stem.
I almost forgot that I made a very simple drill handle from looking at a photo from your website. I just used a 2 by 4 with 3″ metal pipe hangers. I added a 3″ rubber coupling in between the pipe hangers and it worked great.
So now everything’s ready and we start the pump. I will be honest with you and tell you I didn’t follow your advice on how to add the bentonite. I just sprinkled a few shovels full in mud pit each time we added a section of drill stem. I used very little, approximately 40 lbs for the whole project. It must of worked because in 60′ we never got drill stem stuck and after we lowered 2″ casing down the drill stem removed easily.
The drilling went fairly easy, we did encounter 2 layers of clay that went slowly. But we stuck with it and in many spots we had to hold drill stem up to prevent to prevent it from dropping to quickly! We would drill a couple of feet then pull stem up, let the cuttings clear than repeat. One thing I really like about this system is you can watch your cuttings and you know what’s down there. When we were in sand our drilling fluid was grey and when we were in clay layers it turned orange. Ok, we are at our target depth of 60′. Time to case and gravel pack well! Oh, one other tip when drilling. I learned that after you shut down pump to add a section of drill stem, when you are ready to start pump back up have someone hold drill stem up a foot or so off of bottom of well. This will help getting the water flowing again.
The casing went fairly easy. You do need some help here because you are lowering 10′ sections at a time down the 3″ temporary casing. I used all inside couplings on my casing and also glued and screwed them. I am very paranoid about loosing something down the well! Obviously I lowered the 30′ of well screen first followed by 30′ of solid pipe. I think I forgot to mention that when I installed my guide tube at a 13′ depth the water rose and stabilized at about 9′ below ground level so I already knew where my water table was. This is important when deciding how deep to drill and how much well screen to install. Now its time to remove temporary casing. Thanks to the bentonite the drill stem is loose but you have to be careful that your well doesn’t come up with your temporary casing. I handled this by holding down well with a bar and lifting drill stem a few feet. Then I poured gravel down 3″ pipe until I could pack it with bottom of drill stem. I used a very coarse concrete sand that is available in Southern New Jersey for my gravel pack. The best way to describe it is it’s like a rice. It is important to add gravel pack very slowly so it falls to bottom of well and doesn’t “bridge”- Fancy way of saying doesn’t get stuck before falling to bottom. After doing this a few times the well is secure and we pulled up 10′ of drill stem at a time, then simply cut off drill stem every 10′. Also every 10 feet we kept adding gravel to well.
Almost finished! The well is drilled,cased,and gravel packed, now it’s time to clean it out or “develop it”. Seems like this can be done by pumping clean water back into well or blowing high pressure air into well. If you look on YouTube at “air developing a water well” you will see some good examples of this. At any rate what you are trying to do is clean out any fine sand,bentonite, cuttings, etc. that may be left in well from drilling process. I used a large compressor ( like the kind they blow sprinkler systems out with) connected to 3/8″ air line. You have to put some type of metal fitting on end of hose so it has some weight to drop to bottem of well. Once airline is at bottom slowly pressurize until water blows out of well. I put a elbow on top of well just to direct dirty water away from well head. This works nicely. What happens is the air will blow all the water out of well, the well will recover “fill back with water” and the process repeats. This really surges and cleans the well. The water starts out dirty but after a while it clears up and you know the well is clean.
Last thing to do is test pump the well and measure production. I hooked up the mud pump that I used for drilling the well. It is very important that you don’t have any air leaks on the suction side of your pump. You are trying to create a vacuum to draw the water up and if you have a air leak this will be impossible. It’s a good idea to use pipe dope on all threaded fittings as this will help with preventing air leaks. Once the pump is primed you can fill a five gallon bucket, time it, and calculate your gallons per minute. In case I’m pumping 75 gallons per minute!
Now that I know my GPM I’ll Be in the market for a pump. Since my well will be used for irrigation I’ll need a high pressure pump. I’m going to go with gas power because my distance from electric. I’ve learned that when picking a pump for irrigation head pressure is just as, if not more, important as GPM. Even though the mud pump can pump 75 GPM it would be useless as a irrigation pump because it has low head pressure.
Finally the last thing I’ll do is seal the top of my well. Once I purchase the pump and decide how I’m going to configure it I want to pour a small concrete pad around well. This should do a pretty good job at sealing the well.
Well Mike that’s my story. Hopefully I didn’t get to long winded with it! I know you know most of this stuff but I tried to explain things in case you want to add my experience on your web site. Please feel free to do so. I really appreciate all the info you have provided. I would have never been able to complete this project without info you and your readers posted. I’ll be sure to send a pic of pump once everthing is finished. Have to let the wife settle down a little again before I can purchase pump!
Thanks again!!
Steve