Here is a solution!
Many thanks to Rainah for keeping me posted on this story which takes place over the course of 15 months. Rainah and her husband Joe live just north of Houston, Texas and they wanted to be able to irrigate their lawn without having to enrich the water company. They drilled their own well but had low water volume output.
This is another excellent example of how the most effective solutions on this website come not from me, but you, the readers. I can’t emphasize enough how much I appreciate the solutions you send me. Joe and Rainah had devised a great solution to a very common problem. They also demonstrated a staggering amount of perseverance in their well project.
I’ll get to the long story of their drilling efforts but first I’m going to cut to the chase and show you the result. I occasionally hear from folks who have done everything right but have low Gallon Per Minute (GPM) water output from their well. This is frustrating but as you will see, certainly not fatal to the project.
After Joe and Rainah finished their well, they got 1.0 GPM output. In a full minute, their well pumped one gallon of water.
Most newly drilled wells tend to improve over the first few days or weeks of use. That is because as the well is pumped and water flows underground to the well screen, the water erodes paths to the well screen. These underground paths get larger as more water passes through and the net result is the well produces more water.
When Joe and Rainah’s well started out at 1.0 GPM they simply kept pumping. After 22 hours, it improved to 2.5 GPM and that is where it has stayed. Although that is a 250% improvement, it really is not enough to be a useful water source for most applications. For example, one rotating sprinkler head typically uses five or six GPM.
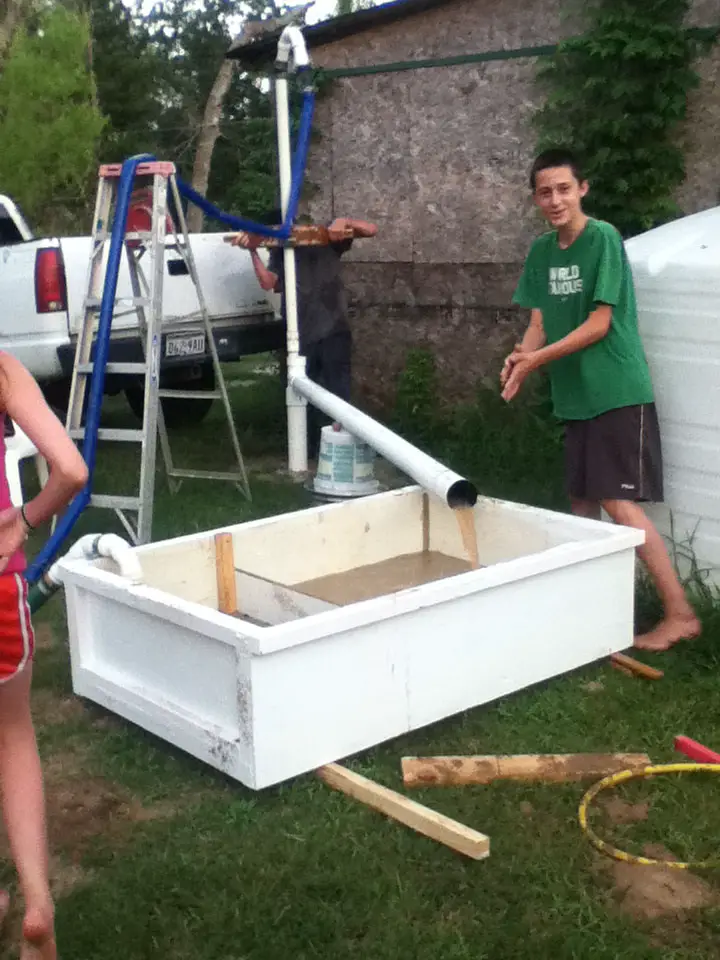
Not to be deterred, Joe and Rainah added a whopping 1500 gallon storage tank to their system! Check out the photos below.
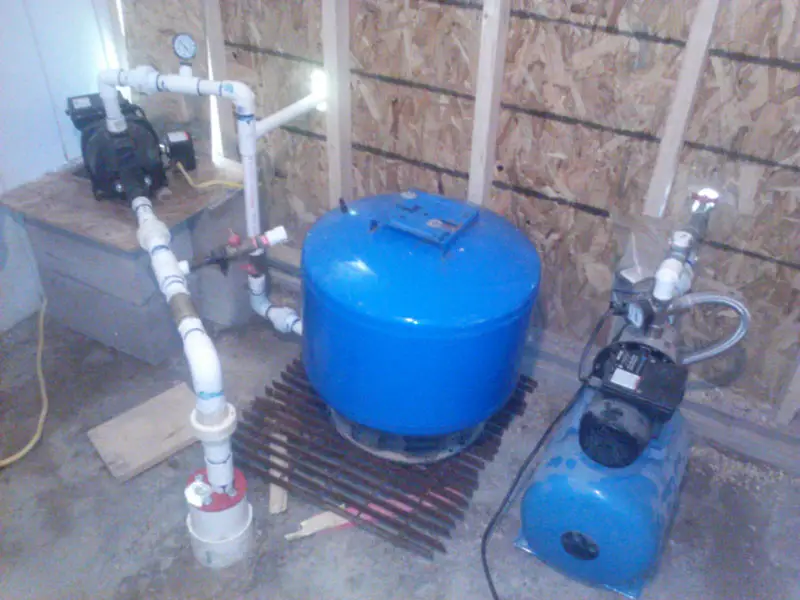
On the left is the well pump. On the right is the tansfer pump for pumping from the storage tank.
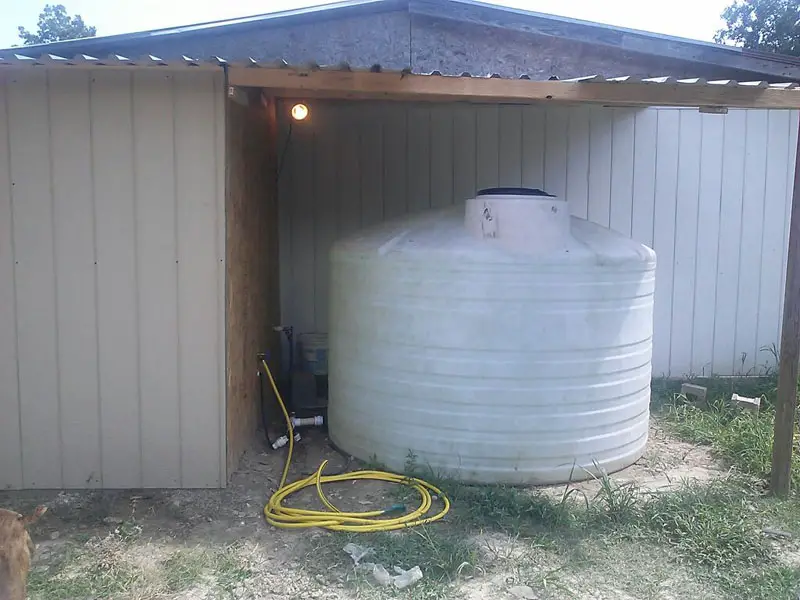
Next to the pumps, just outside, is the 1500 gallon storage tank
Their well pumps its 2.5 GPM into the storage tank. In the top photo the pump on the left is the well pump. Then, when they need water, the transfer pump on the right pumps water from the storage tank. From the storage tank they can pump 10 GPM!
Pretty crafty Joe and Rainah!
————————————————————————————————
So, here is the long version of the story of this project. In July of 2013, I got this email from Rainah:
Hi Mike,
Thanks for all your helpful information. Your videos are awesome, and I got alot out of your comments and questions page. I really like to try to find the answers to my own questions, but I have come across a few I need your help with. What is a brady T pack? The link you provided leads to an out of service site, and I can’t find anything on google about it. I would like to know what is , and what is it used for, and, where to get them.
Also, I live about 65 miles from the Gulf of Mexico, just north of Houston, TX. How far do you think I would have to dig to get water just for irrigation purposes? I just don’t want to pay the water company to water my lawn. As soon as I can get all the info together, I will put my husband and son to work on this project : )
Last question…about the wellpoint. I understand you leave the 1.25 inch pipe in the ground, hold it in place and pull the drilling pipe out. Eventually, you get to a point to where you can’t hold the 1.25 pipe in place. Do you just cut the 2 inch pipe as you go, or will the 1.25 pipe stay in place? I guess that is the only things that have me stumped.
Again, thanks so much for all your information. It is very interesting.
I thanked her for telling me about the dead link, explained that a homemade well head was better than the Brady Kit anyway and told her to pull the two inch pipe out of the ground when they were done drilling.
Joe and Rainah moved ahead with their project and decided to go with a mud pump drilling system. She replied:
Hi Mike,
Thanks so much for answering my questions. I have already purchased a mud pump and all my pipe. Well point IS NOT available in my area. They don’t even know what it is. I have to order online. I found a company (water source)that sells 4 foot PVC wellscreens for 16 bucks, the model number is WSWP125-4-PL, and their phone number is 800-346-7611. I bought 2 since the shipping was 10 dollars whether I bought 1 or 2. I just wanted an extra incase I mess up. I still have to get bentonite and the packing material for the wellpoint. But I do have a question that will delay my project until I know what to do.
Ok, I saw the post about packing the wellscreen in with paver sand. That is the route I’d like to take. But the question I have is this…will the regular paver sand you buy at Home Depot be good for this project since I can’t get pea gravel through 2 inch drill stem. If I understand correctly, I pour the sand in between the 1.25 and 2 inch pipe, and lift the 2 inch up until I cover the wellpoint, and the drillstem is sitting ontop of the sand. If so, ok I understand.
As for the bentonite, I will be using a mudpump to recirculate the mud. I probably won’t drill more than 25 feet. How much bentonite do I use, how often do I add it to the water, and what point do I stop using it?
Last question…I’d like to leave my drill stem in as a casing. How far up do I have to pull it out of the well? When I do get finished, I will send in my results step by step and how I did it so it will help others.
Also, it is ok to post any of our correspondence on your site.
Thanks so much, and I do look forward to hearing from you.
Sincerely, Rainah
Joe and Rainah’s mud pump drilling setup
I suggested they try a practice hole. They did and on the first try they got stuck. Joe was experiencing some difficulties but he simply refused to quit. Here is Rainah’s next email.
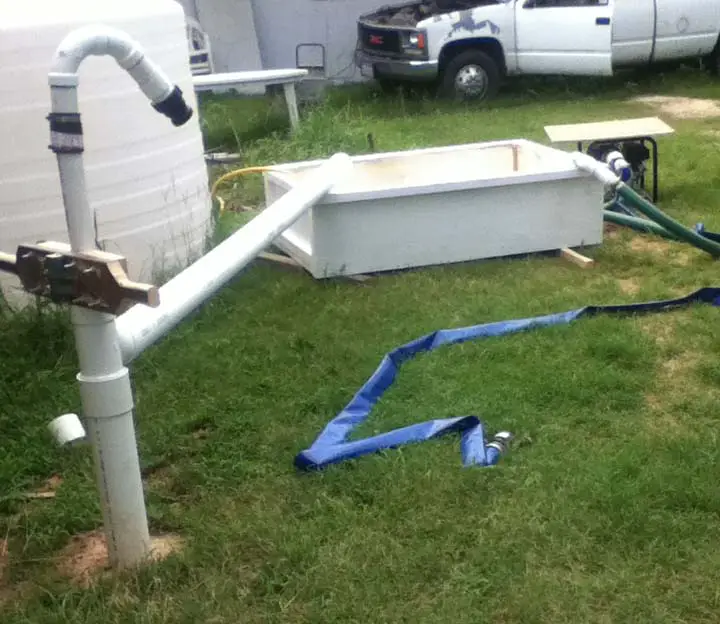
Thanks so much for getting back with me so soon! That’s a relief to hear we’re on the right track. I tried to provide you all the pictures I could so you can understand what we are doing. I send a pic of the spare wellpoint we bought. The one we used is still in the ground. The mud pump is a 3 inch that we reduced to 2 inch. We had a submergible pump with a 2 inch hose picking up the run off water from the ground to return it to the tank to conserve even more water. About every 10 minutes, we would open the mud pump to full throttle to flush everything out. As far as the shallow well pump, we are running short on cash, so we went to harbor freight and bought a cheap pump with a 5 gallon pressure tank on it. once we get he well to work, we’ll get a good pump. If we end up having to pull the 1.25 wellscreen out, we have a small front end loader, and I’m pretty confident we can pull it out. It can handle 1000 pounds. I do want to thank you for helping us. My husband has Crohn’s, and people with his condition stress and worry about EVERYTHING, and it is taking a big toll on him. His stomache isn’t up to the challenge, but he won’t quit. So he will be so glad to hear we are doing something right! I look forward to hearing from you. We do value your input. Thanks again….Rainah
Here is her next report:
Hello Mike…
Its Rainah,…. again. First I wanted to say thanks for all your advice as its been most helpful, and for gettting back with me as much as you have. It has been most helpful and very encouraging. I really hate to bother you with problems, but I really don’t know where else to turn. I’ve purchased a new 2 inch mud pump, all the expensive hoses, and even made a mud pit like on your video, but larger. With all the equipment and pvc and fittings, we probably have about 800 or more dollars invested in this project. So we can’t afford to abandon it.
We put about an 8 foot piece of 4 inch schedule 40 pipe in the ground for a starter hole with a Tee and fed it to the mud pit, and it worked just as you described. My husband took a 2 inch black metal nipple and fabricated his own drill head, just like you had pictured. It has 4 teeth criss crossing each other, so the well point was not able to pass through it. We drilled through 12 feet of HARD clay, which took over 10 hours of non stop drilling. Past 12 feet we got into soft sandy clay with pea gravel, which was easier than the hard clay. We still had to work at it, but it was alot faster than the hard clay. Between 15 to 16 feet down, we hit soft sand, or may I say QUICK SAND! The water immediately changed color to a light gold color, and fine fine sand. It was just wanting to suck the drill stem down. We had to hold it up. At this point, we decided not to use bentonite because we thought we were in water bearing sand, and we didn’t want to stop up the wellpoint. I do have a 50 pound sack of bentonite on hand, but decided not to use it because we could see the clay was not collapsing on the drill stem. We pulled the drill stem out, and it was hard, since it was sticking in the soft sand. We immediately ran the 1.25 wellpoint all the way down it, and ended up being 22 feet down. We put a string line down it, and found our water level is 13 feet. We felt good about everything so today, we bought a shallow well electric pump, hooked it all up, primed it, and it will not pump water. We primed the well for almost 2 hours. Nothing comes up. We have a check valve at the top. We disconnected all the plumbing, put a garden hose down it, and let it run full blast for over 15 minutes, and it WILL NOT fill up. the well sucks every bit of the water down. Pulled the hose out, and put air pressure on the 1.25 wellstem, and it builds up pressure. Take the air hose off, and it blows air back out for a good minute, with no water. We have way too much invested in this to quit, so no matter what it takes, we will do it. Can you guide us in the right direction? I know I am asking alot of you. I just know this world does not have many people like you who are helpful to others, so believe me, I do appreciate the info you have given! If it wouldn’t be asking for too much could you call me so we can chat, and perhaps get me lined out? Thanks again for everything!…..Rainah
I didn’t know. They figured out the problem themselves. The check valve was backwards. Then, they had another problem.
Ok, I think we discovered our problem. We re-checked the water level, and it looks like we only have 4 feet of water at the bottom of the well. When we first checked the water level, we used a string after we had been priming the well. So the string was probably only wet due to the water left on the pipe. So the water level is at 18 feet, the well is 22 feet deep. since we have a 4 ft wellpoint, it is barely covering it. Since we can turn the well pipe, we are going to try to drive it in the ground about 5 more feet. Do you think this will work? We will let you know what we come up with after we try this. Thanks….Rainah
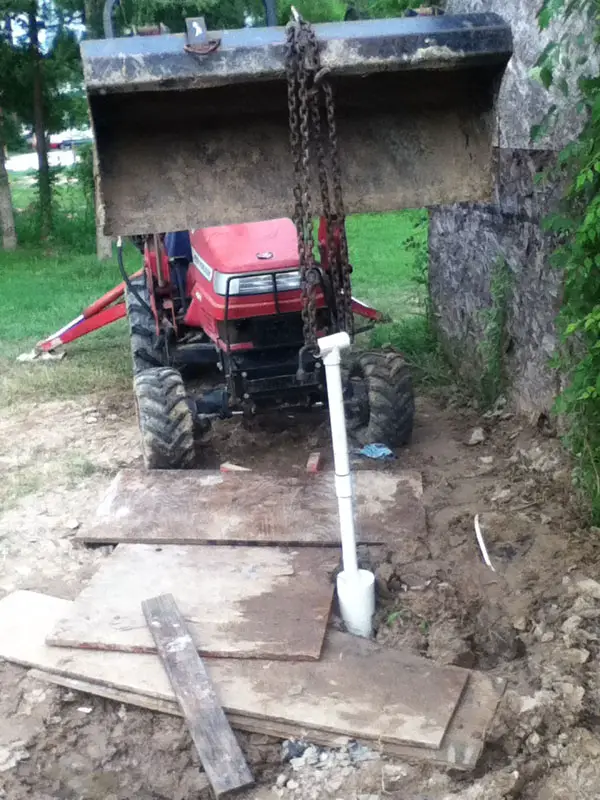
It turned out they were sucking air because their well screen was not fully submerged. So, they needed to run their well screen in deeper. I suggested they try an electric jackhammer. That didn’t help. So, they wanted to pull their well screen pipe out and re-drill. Rainah sent me a picture of their technique for removing a stuck drillpipe. Wow. Impressive effort. Check it out!
They redrilled and this time went to 40 feet, stopping the bentonite on the last 10 feet. Here is Rainah’s report:
Hello Again Mike!
We went ahead and drilled the well the rest of the way to 40 feet. We stopped the bentonite at 30 feet. Started over with a fresh supply of water, and finished drilling. We poured gravel down the drill stem and then tried to run the wellstem down it. The first thing that happened with the PVC wellpoint is it snapped in 3 places trying to get it aimed right. Thank goodness we had a spare one! So a quick note…. just make sure when using a PVC wellpoint to be very careful with it, and have a spare on hand. After that, we tried once again (with my husband and son feeding it down from the top of the garage) to put the wellpoint in, but at about 15 feet in, it hung up, and would not go down the drillstem. We figured the couplings on the 1.25 pipe were hanging up on some gravel that didn’t wash down the drillstem. We removed the drillstem and ran the wellpoint pipe. After we did that we thought that we should have washed out the drillstem to remove any excess gravel or sand buildup. (live and learn) We got the wellpoint about 2 and a half feet into the gravel pack, as that is all it would go. It does still turn, but we can’t get it any further down. So, we put an airhose to the bottom of the well to blow out the sand and debris. Now the good news. We got water! The static level is about 20 feet. The water is crystal clear. We are very happy with a success.
We used the harbor freight well pump to draw water from the well. Our flow rate is less than a gallon per minute. It takes 7 minutes to fill a 5 gallon bucket. We would like to try to really flush the well good. We have the 2 inch mud pump we could adapt to fit the wellstem, or we have a submergible pump with an inch and a half discharge that wouldn’t be as powerful also. Would it be ok to pump fresh water down the well to the wellpoint to flush it with one of those pumps? Could it make our flow rate any better? We know we are 15 to 20 feet into white coarse sand, and none of it is getting into the wellpoint. Since the wellpoint can still be turned, we wondered if it would make a difference in flow rate if we sealed it with dirt and clay. We wanted to wait to do that in case we needed to drill more. With it not being sealed, could that cause a slow flow rate? Also, if you wouldn’t mind, can you tell me what the average flow rate is for 1.25 wellstem?
We also took your advice on priming the well both above and below the check valve, which worked great once my husband discovered the check valve was upside down! (HA HA!!!) I attached some photos so you can see our setup. Any advice on improving the flow rate would be greatly appreciated. We have powerful pumps and a large air compressor to work with. Once we are finished, we sill pour a slab and put an addition on the back of the garage to house the well. We will send you pics of that, but it will have to wait until September when the Texas heat gives us a break. Its been 102 degrees plus high humidity and no shade! Tomorrow, I will send you a pic of the new drill head too. Well Mike, thanks so much! We could not have accomplished any of this if it had not been for you!
Rainah
Drilling the well
Before we go on, I think I should state the obvious. Rainah keeps giving me and this site credit but by now I realized, and you probably have to, that Joe and Rainah would have figured this out all on their own. They are real “can do” people.
Anyway, so at this point they are getting a gallon per minute but it is good clear water. I suggested they simply run the well for a while and it would likely improve the output. I thought 1 GPM was insufficient but Rainah seemed to think it was fine.
Hello Mike,
We would like to let you know that without your site, and all your helpful emails, we would not have a well. I know you said you were confused as to why we shoved the point into the gravel pack. Well, now I’m confused. Was there a better way to do it with a 2 inch drillstem? We get hurricanes in Texas here close to the coast, and during the last storm, Hurricane Ike, we went well over a month without water. We had a generator with plenty of electricity, but no water. We couldn’t wash clothes, take a bath and water was more important to us than electricity. When you don’t have it, you realize how valuable it is. We literally had to use ditch water to “clean” laundry. I would have given anything then to have 1 gallon per minute of clean water. I know our water level will come up since we are in extreme drought.
I have been doing some research, and I have been talking to the big brand pump companies. This is what I have been told by several of them. The static water level has alot to do with flow if you are drawing from just below it, with say a foot valve. However, since my suction point of entry is at 40 feet, the pump has has to draw water from there. a shallow pump has a hard time carrying up the whole 40 feet from the wellpoint continuously.. which would explain our slow water rate. I was told to get a deep well jet pump with a conversion kit for the venturi tube. Flotech explained with my well depth and static water level, I need to order this: Pump FP4312, and Jet Kit FP4840, and it will probably work. They say the depth of the well makes a difference since the pump has to draw the water from the bottom of it where the wellpoint is.
So I went to Home Depot and ordered one online. I have really nothing to lose. If it works, I keep it, if not, I will take it back. We are going to build a PVC hand pump as well with a few check valves. So one way or the other, we will have water thanks to your website. I will let you know how the new pump works out when we install it. Since we are familiar with what we are doing now, we will try another well when the heat goes away with a 3 inch drill pipe and use a couple of 2 inch wellpoints for a 2 inch well, so we can have the option for different means of drawing the water out when the water level drops. Here is a picture of the different drillheads my husband welded. The one with fewer teeth cut through the clay and broke it up without stopping up the waterflow, and the one with longer teeth was able to go through the sand and push it up to the surface. Thought I would share that with you. Thanks again for all your help as this has been a learning experiance for us.
Rainah
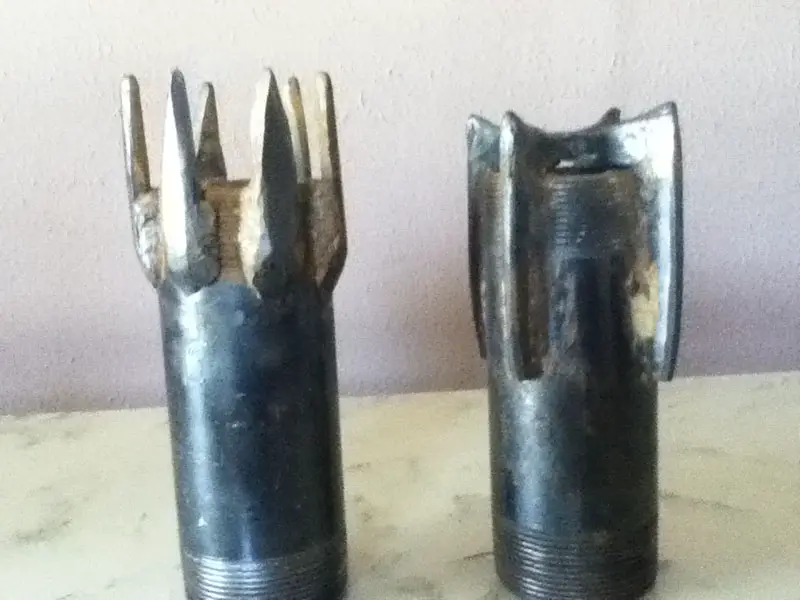
Drillheads fabricated by Joe and Rainah
I explained that the distance to the bottom of the pipe is irrelevant. The critical thing is the distance to the standing water level:
Rainah,
Thanks, I’m glad the site and I helped you. The drill bits look awesome.
Regarding the suction pump, the critical thing is the distance to the standing water level. Look at it this way. Imagine you were in a boat in the Gulf of Mexico trying to get a drink through a straw. (also imagine that drinking salt water won’t kill you). If you are leaned over the side of the boat sucking on a straw does it make any difference if that straw is six inches or sixty feet long? Some, but not much. Either way, you will be able to suck the water up the straw.
Same thing on pumps. Just humor me and pump that well a few days continuously and see if it doesn’t improve.
Mike
She replied:
What you say makes alot of sense. I will give the pump I have now a shot at running continuously. I will let you know how it goes. Thanks
They sent pictures of their well as it progressed. They took the time to improve their priming ports.
Take a look at the pictures below. They show the standard way and the improved way to setup up the priming ports. Most wells only have a place to add prime above the check valve. This is fine if the check valve is at the bottom of the hole (where it is called a foot valve.) It is also fine if your pump has enough suction to pull water up from the bottom of the hole without being fully primed.

Only one priming port – above the check valve
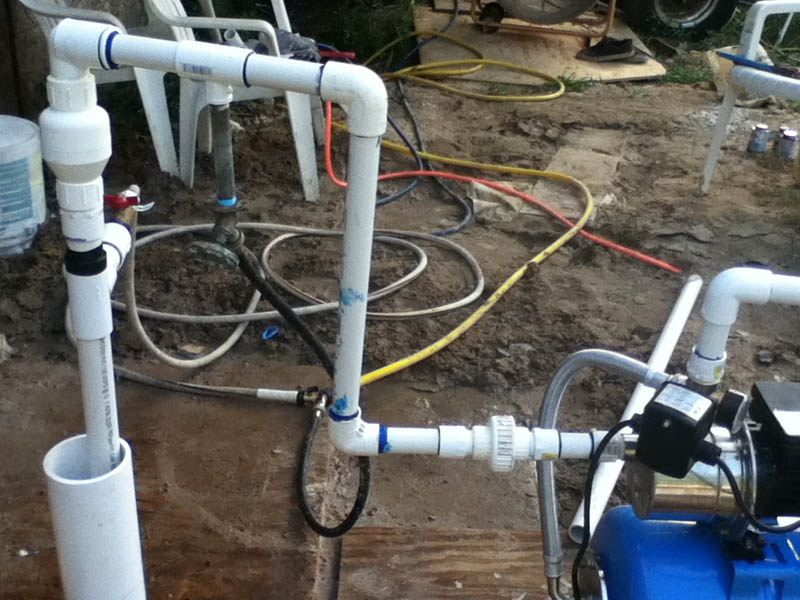
Two priming ports – one above the check valve and one below
A far better way to plumb your priming ports is to place a priming port both above and below the check valve. That way, you can fill the entire well pipe, from the bottom of the hole to where it enters the pump, with water. Pumps have a difficult time with air. Many can’t tolerate it at all. By putting water in the entire well pipe, you eliminate this problem.
As you can see in the bottom picture, Joe and Rainah ultimately placed priming ports both above and below the check valve and it worked much better.
– – –
We exchanged a few emails regarding hurricanes which we both have to deal with regularly as we are both on the coast. That was August of 2013. She said they needed to replace the Harbor Freight pump with a more robust pump. Then in August 2014, she reported success. Running the new pump for a long time improved the well output enough that combined with a storage tank they had a usable system! Here is her report:
Hey Mike! Its been awhile since we last emailed you, but we’ve finally finished the project! We hooked up a 1500 gallon water tank, which took about 20 hours to fill. then we checked our water flow. It went from 1 gallon per minute to 2.5 gallons per minute, which compared to what it was before is a substancial increase. We use the 1500 gallon tank as storage to draw water from to irrigate our yard, which gives us all the water we need. It also shows the silt that is coming from in the well, so with all that silt being removed, the output is increasing. We will probably end up completely draining it and refilling it next week some time. When we do, we will time it to see how much faster our output is.
The reason I’m emailing is because without your encouragement, we wouldn’t have gotten this far. It took a while to complete, but its done, complete with a well house, 20 gallon pressure tank, and 1500 gallon storage tank. Thanks for everything!
…Joe and Rainah
In another email she explained:
just running it for 20 hours increased the output. when it started, it was running 1 gallon per minute. when we ran 1500 gallons through it, it increased on its own to 2.5 gmp. We have 2 pumps…one for getting the water out of the ground with a 20 gallon pressure tank, and one for the storage tank. With the storage tank, it really doesn’t matter what the output is because there is a constant supply if we keep it full. If you have any questions about the pics, let me know. Thanks again for everything….Joe and Rainah
So – Congratulations to Joe and Rainah! These are two folks who just refuse to quit. Very impressive effort!