One of the problems DIY well drillers occasionally have is low production – inadequate water flow. I hear from readers who have successfully drilled their own wells and are initially happy to get free water. Then, after a month or so, they are looking to improve their wells. Wells will improve on their own to a large extent when they are first pumped due to underground erosion that makes it easier for water to flow to the well screens. Frequently though, even more improvement would be most welcome.
I have heard from two home drillers who have offered solutions they have used successfully. I thought it would be useful to others to post them.
The gist of both techniques is to force water down the well to try to clear out any blockage around the well screen. The more force you can muster, the more effective it will be. If you can pulse it, the technique will be even more effective.
The first is from Gary in Newport News, Virginia. He drilled a well using this technique and initially had only 3 GPM production. Below is how he improved it to 7 GPM. As information, his situation was a little unique in that at the time he had a two inch well screen and pipe inside a three inch pipe. He has since raised the 3 inch piece as it was causing a loss of suction. I have pieced together parts of several of his emails.
Mike,
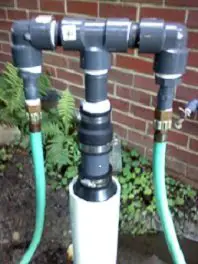
This evening, I came up with two ways to possibly back flush water down the well pipe in order to force the fine sand and other sediments away from the well point screens. Please note the two, black rubber adapters in the photo’s below. The smaller, upper one is 1 1/2″ X 2″. The larger, bottom one is 2″ X 3″.Idea #1. Use only the upper adapter and just remove the lower one. With both my well pipe and casing both being down into the thick muck and directly interacting with one another this would flush water up and out of the casing. Probably bringing material up with it. The problem with this idea is that only the lightest material will make it all the way up and out of the casing. The heavier sand will rise part way up the casing and then sink back down when you turn the water off. I chose not to use this idea as I did not want to flush more sand into the well casing while forcing it away from the well screens. In another situation it may be useful.
Idea #2. Use both rubber adapters just like the photo below. The bottom of the lower adapter is 3″, and it fits perfectly inside 4″ sch 40 PVC pipe, …just like in the photo. Just slide it into the pipe. When the water is turned to the well pipe, it tries coming up and out of the casing with a lot of pressure. Initially, this seal leaked a little water, but eventually sealed perfectly to the inside wall of the 4″ pipe, …and never blew out of the pipe. The more pressure that comes up against the 3″ cup side of the adapter, the tighter it seals to the pipe wall. Just be sure that the hose clamp on the 2″ side of the adapter is tight, or the pressure probably will force this adapter upward. Whats great about this idea is that the lower adapter prevents upward water flow thru the casing. This allows you to back flush the well point without putting more sand into the casing. All material that would otherwise rise in the casing and be too heavy to make it out of the top would just settle back down around the well point when you shut the water off. With this lower adapter in place, basically all the back flushing force is used to push sand and other materials horizontally away from the well point.
This evening, I used idea #2 and back flushed for one hour. I’m going to let the sediments settle over night, then tomorrow morning prime the system and recheck flow rate. I’ll let you know how this flushing method worked. It should make an improvement over the 2 gpm that I got this morning.
See the photo below to help with the explanation
As you know, last evening, I back flushed my well point by attaching the 2 hose manifold (well head) to the well pipe and forcing all the water that the two garden hoses could supply for one hour. The purpose was to force sand and other sediments away from the well point screens and clear an area around the well point of finer sediments. This was done because my new pump & well pipe was primed for the first time two days ago and produced 3 gpm. After pumping water for 24 hrs, the rate dropped to 2 gpm.
This morning, I got out early, primed the well pipe and began pumping water at 8:00am. Apparently the new brass check valve is doing it’s job well because when I removed the prime plug, water came up out of the port. A couple of minutes after the pump had a strong, steady flow coming out, I checked the flow rate and got 7 gpm. On this first test the water was so gray colored that you could only see about 1-2″ into it. I don’t know if what colored the water would be either gray clay, or silt. No sand could be felt or seen in this water. Over the next 2 hrs, I checked flow rate 4 more times and it steadily dropped to until the last test was at After the first test all water came out clear.
The two hose manifold with two, 5/8″ hoses is how I took my well from 2 GPM to 7 GPM the other day. Of course, no two wells are the same. I have a 2″ well pipe, 2″ X 4′ well point, and a 3/4 HP pump.
I also heard from John in Wichita, Kansas. He had an existing well with a screen that had apparently become clogged. Using a device that contiually sends pulses of water, he improved his flow rate dramatically with this technique.
Your website is very well done and a service to the water well community..Thanks..
My garden well had a poor recharge rate. It’s 1.25″ galv pipe,3′ stainless well point,20′ depth,and 6′ static water level..I devised a technique to attempt to improve the well..I put a half gallon of household bleach in the pipe and left over night..I attached a Oatley clog buster ( for 1-2″ drain for $10 at the hardware store) to my city water hose and injected 6 gpm for 1 hour to back flush the well under pressure…
After the operation my well produced 215 gph with a 75′ hose,half-horse Utilitec pump and no pressure tank..Just right for a sprinkler..
The Oatey Clog Buster comes in three different sizes. Info at https://www.oatey.com/products/cherne-clogbuster-drain-flusher-1562185222 The more water you can get to it, the more effective it will be. If you have a three inch or larger well/screen pipe, I’d suggest rigging up a way to feed the larger model with two hoses.
One more tip from Paul in Smithtown, New York. This is ONLY for folks with galvanized or stainless well screens. Please don’t try this on a PVC well screen!!
50+ years ago my father had a shallow well driven in East Rockaway NY where the water table is only 8 feet down. It was made from galvanized pipe. The stainless wellpoint would regularly clog and he would clear it be pouring muriatic acid down the well.