Here is a good tip from a fellow home driller:
I was doing some well drilling over the winter. I noticed during the winter that my pump was short cycling. I finally got around to figure out what the problem was and found that my pressure tank almost completely full of water (most likely ruptured bladder.) The tank itself is about 27 years old. What may have happened was when I was forcing down the drill head to help bring the cuttings to the surface that it might have resulted in water going back to the pressure tank with considerable force if only for a moment but that might have caused the bladder of the tank to rupture combined with the age of the tank. In light of this, it may be a good idea to install some check valves to help reduce the possibility of rupturing the bladder in the pressure tank.
Nick
Thanks Nick!
Mike,
I live about 6 ft above sea level according to my phone. I jetted my 2″ pipe 28 feet, before the water quit flowing upward around the pipe. Then when I tried pulling the pipe up i couldn’t move it. I tried leverage, but I realize it was not coming out, it will break at the coupling. I was wondering if I could just take my 1.25 inch pipe with a drill another 10 feet. Fill with gravel and jam my well screen pipe into the rock. Or am I missing something?
You are on the right track, but what you describe won’t work. You won’t be able to jam the well screen pipe far enough down. Do either one of these with NO bentonite: 1. Get a funnel that your pea gravel will fit through easily. Jet down another 10 feet with a 1.25 inch drillpipe. Carefully measure how much further down you drill. It doesn’t have to be 10 feet but you need to know the distance. Leave the 1.25 drillpipe in but take the water supply off the top. Then, using the funnel, pour pea gravel down the 1.25 inch piece as you pound the pea gravel down by working the 1.25 inch pipe up and down. Fill the bottom of the hole up until you get to the 2.00 inch pipe. Attach a pump to the 1.25 inch piece. The pea gravel serves as your screen. 2. This solution is best: It will give better production but wastes 1.25 inch pipe. Use a 1.25 inch drillpipe to drill down another 10 feet or so. 15 would probably be better. Once you get down to however far you are going, stop drilling downward but work the pipe up and down and side to side a lot. You want to make as wide of a hole as you can down there. Then, leave the water running and make up a well screen. If you can afford multiple pieces of 1.25 inch well screen make up a piece of well screen 10 feet long. If not, use a regular three or four foot piece of 1.25 inch well screen. Attach enough 1.25 inch pieces of PVC, so that your well screen will reach the bottom of your newly expanded hole. Get a helper or two for this next part. Then, QUICKLY: 1. remove the water supply from the drillipe. 2. Pull the 1.25 inc drillpipe out of the two inch pipe and; 3. put the 1.25 well screen piece back down the two inch pipe. You want to accomplish this before the sand in the bottom of the hole can collapse.
Hi Mike,
Great site on drilling! I worked in the oilfield for several years and have a comment on the gravel pack. Pea gravel is way too large, I would use Paver Sand (sold at the big box stores) in place of gravel. It is a very large sand that will fill in around the well point much better than a pea gravel. When I lived in Florida we would take a sample of our final sand to Johnson well screens and they would measure the grain size and sell you a screen with slots that were just smaller than the sand. You want a pack that will hold back the fine sand at the bottom of the hole, yet flow with little or no resistance. It is nothing but a filter that keeps your screen slots from plugging and extending the life of the well.
Again, thanks for the info,
Bill
Prosper TX
Bill makes a good point here. The gravel pack has two functions. It effectively increases the size of the well screen by providing more surface area against the surrounding earth. It also filters out the fine particles that could get stuck in, or get through, the well screen. A pack made of sand will be much more effective at filtering the fines. Thanks Bill!
Hey Mike,
I wanted to first say thank you for putting an informative and relevant web site together for drilling a well yourself. The best DIY website I ever came accross. People will/are definitely saving money. After I received quotes for $1500 to drill a shallow well here in the Panama City, FL I found that to be outrageous. I drilled myself using your web sites info. It was working but I ran into a problem. After I got 20′ of 3″ pipe down in an less than 1.5 hours(no clay all sand), I was ready to connect the 3rd and last 3″ pipe. I drilled another 4 feet and could go any further…I worked the pipe back and forth and flush it several times and then the coupling broke! My fault, I didn’t let the cement dry before starting to drill as I was so anxious. I was drilling a fraction of the amount of time you were describing. I have a couple of questions for you. If you have time I would greatly appreciate your feedback.
1. I am going to try to retrieve the pipe by placing a new coupling on the last 3″ pipe and try to reconnect to the pipe in the ground(no coupling attached). Is this worth my time and efforts? I can see the pipe in the ground(5-6′ down) and I really want my well to be placed in this particular location. Any feedback or advice would be great.
2. If not worth the time trying to recover, how close can I start a new well to the existing failed well attempt?
3. I don’t have a pump and I plan on ordering one can I still drill set the well screen and attach a pump later?
4. I looked at other peoples shallow well and they use 2″ pipe will my well be compromised by using 1.25″ pipe? Is there any real significant difference
?
5. When I was looking at pumps I wanted to get one that “self primmed” so i do not have to prime it. I dont really know what I am looking at or what to consider purchasing any advice?
Thank you again for all the helpful information and putting together such a useful web site. I look forward to hearing from you.
P.S. I do not mind if you post this email
Regards,
-Mike
Panama City, FL
Mike,
I’m glad you like the website!
Hey! 24 feet of 3 inch pipe! You have done the hard part. Don’t give up! Here are several strategies to finish drilling your well beginning with the easiest and cheapest.
1. You will need to dig deep enough to be able to cut off the top part of your existing pipe in the ground. Then you will be able to glue a coupler on the pipe in the ground. Next, if you want to try to free the pipe, wash a 1/2 inch pipe down beside it and try to pull it up.
That may or may not work. If it does not work:
2. Assuming you successfully get a three inch pipe glued on, make a big lever with an eight or ten foot long piece of 2X6 or 2X8. Wrap a rope around the 3 inch pipe a bunch of times and then use the 2X6 or 2X8 as a big lever to pull the pipe up. Be careful to pull straight up. You’ll have to invent something to use as a fulcrum but it will likely pull your pipe up.
3. If not, connect a 3 inch piece to the existing pipe however you can, glue or no glue. Put a 3 inch tee on the top to direct cuttings to the side. Then, try washing a 1.5 inch pipe down through the 3 inch pipe. You are using the 3 inch pipe as a head start for your 1.5 inch hole you are washing. Go as deep as you can confortably, like another 10 or 12 feet. Keep the water running while you make up your well screen pipe.
Then, QUICKLY pull the 1.5 inch drill pipe out and put the 1.25 inch well screen pipe back down in the hole before the sand can collapse at the bottom.
If the sand collapses so you can’t get the 1.25 inch well screen pipe in, redrill the 1.5 inch hole using a little bentonite mix. Use as little bentonite mix as possible. Then put the 1.25 well screen in.
4. This one is the most expensive but a sure fire winner and my favorite. Go buy a 1.25 inch stainless steel well drive point. Also get drive metal pipe and drive connectors for driving the drive point into the ground. Use the 3 inch PVC as a head start on driving your drive point. Please consider renting an electric jackhammer to do it. When you are driving a drive point, a bunch of little blows is infinitely better than a few harder blows. Check out this video: http://www.youtube.com/watch?v=flYs98xBEZo
Regarding your other questions: (2) You have to be far enough away you won’t hit your existing hole. Ten feet is plenty. Five feet probably is ok unless you jet get unlucky. (3) Sure you can set the well screen now and get a pump later. Just be sure the well screen is way under the standing water level and in a layer of sand.(4) A 1.25 inch well will be fine. They are the most common size shallow wells.
(5) You have to prime a pump. Just plan on it. It is just a matter of filling the well screen pipe and the pump up with water. Plumb your well so you can do it easily.Good luck and let me know if I can help.
Mike
Hi Mike,
Best DIY website I have ever seen! Thank you. About how much water is needed to dig a 30′ well in very sandy conditions- virtually no clay with the two hose method? Think I could get by with one hose with such soft digging? We literally have sand and small gravel down a couple of hundred feet here, no real soil at all.How about with the mud pump method? I have water about ten minutes away and I wonder if I could stockpile 1000 gallons or so in a plastic lined pit. It would be alot of work but then $4000 for a pro dug well is a lot of money.
Anyone you know ever use your method for their sole sourch of water at their home?
John
John,
Pure sandy soil is a little different. One of my upcoming projects is to post a page on drilling in sand.
If you can possibly get a mud pump, it will work fine. Be sure and use a little bentonite. Drill a two inch hole and then put a 1.25 inch well screen and fill in around with pea gravel. Rinse it well to get as much of bentonite out as possible by putting a bunch of clean water down the well screen and letting it wash up to the surface. Test pump it. Then finish the well by pouring bentonite or cement in the annular space.
If no mud pump:
Plan A – 1000 gallons won’t last long enough to drill a well. Each water hose supplies about 4.25 GPM. 1000 gallons divided by 8.5 will last about 117 minutes. You’ll likely need a little more than that. But, it will work. Put a bucket of bentonite down the hole at the 10 and 20 foot marks. Maybe more if you feel like it is locking up on you. Drill as far as you can with 1000 gallons, then pull the drillpipe. The bentonite will keep it open a bit. Get an additional load of water. Put the drillpipe back in and work it back down to where you were. It should go very fast back to that level.
Then, the last 5 five or so feet do not use any bentonite. Bentonite is your friend when drilling and your enemy when pumping the well. You want the bottom of the well where the well screen will be to have as little bentonite as possible.
When you get to 30 feet, keep the water flowing and make up the entire length of the 1.25 inch wellscreen pipe. By that I mean 3 or 4 feet of well screen and the rest plain ol’ 1.25 inch PVC. Then QUICKLY put the 1.25 inch well screen in through the 2.00 inch drill pipe and pull the drillpipe out of the ground leaving the well screen pipe in the ground.
Test pump it. Then finish the well by pouring bentonite or cement in the annular space.
– or –
Plan B – get a 2.00 inch well screen. Cut off the tip. Attach a six inch long piece of 2 inch PVC to the bottom and cut teeth in the bottom end of it. Attach regular PVC to the top of the well screen, starting with about a two or three foot piece. Connect your water to a 1.25 inch piece of PVC and cut teeth in the bottom end of it. Use the 1.25 inch piece of PVC to wash down inside the 2.00 inch wellscreen and try to work the 2.00 inch piece down as you use the 1.25 inch drillpipe to evacuate sand from beneath the 2.00 inch piece. Continue adding PVC to both pieces and work the 2.00 inch piece down as deep as possible. It will like stick about 20 to 30 feet down. That is fine. You are just trying to get that 2.00 inch well screen piece down in sand as far below the standing water level as you can.
Get a board to pound on to push the 2.00 inch piece down if you need to. Avoid damaging the top of the 2 inch piece so you will be able to add to it.
Then, attach a pump to the 1.25 inch piece to test pump it to make sure it will produce. Pull the 1.25 inch drillpipe. Then, seal the bottom of the well by pouring a couple of cups of cement down the 2.00 inch well screen. It should settle in the 6 inch PVC piece at the bottom. Next, finish the well by pouring bentonite or cement in the annular space. Leave the well alone for a couple days so the cement at the bottom can cure. Then put a 1.25 inch piece almost all the way to the bottom so it will be pulling water off the bottom of the wellscreen pipe. Attach a pump to the 1.25 inch piece.
Regarding using it as a household water supply: Deep wells are safest because they have a hundred or so feet of soil, clay, and sand filtering the water. 30 feet of sand is inadequate. Pour a five gallon bucket in the sand and you will see it perks right through it in seconds. Water contaminated with pesticides, fertilizer, etc goes right through as well. I just don’t think you are going to find the water at the 30 foot level in sand is safe to drink. Test it and see.
Mike
Mike,
Thanks, I think I’ll try Plan B. Let you know how it goes.
John
Thanks for putting together this web page!
I was drilling a shallow well in the Panhandle of Florida. Around 15 ft down we experienced the white fine sand and it was difficult to go down further. Then there was a corse sand and pressure kicking back on the well digger handle. Then the hole went dry, draining the water around it. The water that continued to flow through the drill handle was not at the top.
What happened? Did we drill too deep? Did we hit a air pocket? Can we still use this hole?
What do you think?
I’m glad you like the site!
You need to use a slightly different technique in that kind of sand. I’m in Foley, Alabama so I know exactly what you are dealing with. I have the same thing just south of me. To drill in pure sand you need to use a 1.25 inch drillpipe to wash cuttings up inside a 2 inch wellpipe.First connect your water hoses to a 1.25 inch head. You can probably just adapt your existing head for 1.25 inch. You might need to build a whole new one. Then connect your head to a drillpipe, that is, a length of 1.25 inch Schedule 40 PVC with teeth cut in the bottom end.Next, lets talk about your wellpipe. If you can still pull that wellpipe out of the ground, do it. Go buy a 2.00 inch wellscreen and connect it to the bottom end. If the wellscreen has a point on it, usually blue, cut it off and connect a very short piece of 2.00 inch PVC to the bottom of it below the wellscreen. Cut teeth in the bottom end piece.Then use the 1.25 inch drillpipe inside the 2.00 inch wellpipe. The water goes down the 1.25 inch drillpipe as you work it back and forth and wash sand from the bottom up between the two pipes. As you wash the sand from the bottom out from under the 2.00 inch wellpipe, work it down into the ground. It will get hard to work down in the ground and you will likely have to hammer it down from the top. To do this DO NOT HAMMER DIRECTLY ON THE WELLPIPE. Attach a T (no glue) to the top and hammer on the T with a board or a sledge hammer on a board. When the T busts, just get another T. Try to get 10, or ideally, 15 feet below the standing water level. Then put a 1.25 inch piece with a foot valve on in down inside your 2.00 wellscreen/wellpipe piece and attach a pump.If you can’t get the 2.00 inch piece out of the ground, you can still use that same hole. Use the 1.25 inch drillpipe to wash cuttings up from below the bottom of the 2.00 inch pipe as you work the 2.00 inch piece down into the ground. Try to get 10, or ideally, 15 feet below the standing water level. Then make up a separate 1.25 inch wellscreen pipe that is 10-12 feet longer than your 2.00 inch pipe is deep. This is wasteful, I know, but PVC is cheap. Let’s say your wellscreen is three feet long. Go back to drilling with your 1.25 inch drillpipe until you get 15 feet beyond the bottom of your 2.00 inch wellpipe. Get help for the next step. Next, QUICKLY pull the 1.25 inch drillpipe out of the ground and put the 1.25 inch wellscreen piece back down the same hole before the sand collapses at the bottom. Attach a check valve and a pump to the 1.25 inch piece.
How can I get the water from the well if it is more than 25 ft deep? Most pumps I looked at will only pump up to 25 feet.
You have to “push” water up from depths past 25 feet. You can only pull it from 25 feet no matter how many horsepower your suction pump is. It is an atmospheric restriction. There are two primary ways:
1. Use a submersible pump. It typically requires a four inch well although there are some specialty 3 inch submersible pumps. 99% of submersible pumps are four inch pumps. It is a long cylindrical shaped pump designed specifically for fitting in a four inch well casing. The pump is placed at the bottom of the well where it can push the water up to the top. Water can be pushed up from basically any depth using this technique.
2. Use a jet and a jet pump. A typical jet pump requires a four inch well also. There are two pipes going to the bottom of the well. Water is pumped down one pipe into an upward facing jet that picks up some water from the bottom of the well and pushes it up to the top. It might seem a little weird but it works well. There is one jet that will fit in a two inch well. It is called a packer jet. I installed one at a previous residence of mine and it worked OK. It lost prime a couple times a year so I just plumbed it so it was easy to re-prime. Other than that it was an excellent setup.
Gerald in ?? provided this tip for unsticking a drillpipe:
I used a 20 ft piece of 3/4 in pvc.I ran it down the side of the 2 in pipe using it as a jet. At the same time I had the well head on the 2 in with water going in it. I used a wye hose fitting with cutoffs on it to relieve pressure build up. If not for that the well head would blow off under pressure.I just kept working the 3/4 up and down and the 2 in finally broke free. Gerald
Thanks Gerald!
I really enjoyed your website – lots of good information there. I’d seen this done about 10 years ago by a guy who had some type of custom jetting setup that utilized a trash pump and a 400 gallon water trailer. I wish I knew where he got the jetting pipe he was using.
While reading the information on your website, I had a thought about something that could help with jetting larger pipe sizes. It would be more work and take more PVC pipe. You’d also need the same fitting setup you have in the 2/3 inch line created for the top of the larger pipe size. However, that stuff is cheap relative to the cost of spending thousands of dollars to drill a well (especially a larger one).
Say you want to put down a 5 inch casing, for instance.
You jet down a 3 inch line just like you presently do it. Once you have this line to the proper depth, immediately glue a cap on top of the line while it is full of water. You’d want to glue it so you can make absolutely sure it can’t possibly come off under pressure.
Put the 5 inch line around the 3 inch line in the same hole and jet it down in the same manner – the 3″ line will essentially guide the 5″ line and refocus the available water pressure to the area from outside the 3 inch line to outside the 5 inch line. Essentially, you’re reducing the area that has to be dug out to something the available water pressure ought to be able to handle. Putting the cap on the flooded 3 inch line should serve to keep the cuttings and water pressure from flushing back up the inside of the 3″ pipe (fluid doesn’t compress like air does, so in theory this should ensure the water pressure flushes the cuttings up the outside of the outer casing and not up the inner 3″ pipe, especially as you begin to get the pipes closer to the same depth) .
Once you have the larger casing down to the same depth as the inner casing, you should be able to cut the cap off (or simply drill a large hole) to release the contents of the 3″ pipe. The 3″ pipe should now be loose inside the 5″ pipe and relatively easy to remove, leaving a empty 5 inch casing.
Obviously, as casing size increases you’d begin to run into weight issues (wrestling a 35 foot tall section of 4″ or 5″ schedule 40 PVC around would probably be a lot more work as opposed to a 2 or 3″ section).
I’ve thought about giving it a try. The only thing holding me back is that the local farmers in our area have gone nuts in recent years putting in wells and center pivots everywhere in almost all their fields. I don’t know at this point that I could hit water. However, if I can hit water, the larger pipe size would allow me to run a deep well setup as opposed to a suction well (which I doubt would work here any more).
– Ed in Northeast Arkansas
I think Ed has something here. I haven’t tried it but I think it is definitely worth a try if you need a larger diameter well!
I need more water production. What about a second well? Where should I put it?
There are two possible reasons for limited well production (other than a weak pump).
1. Cone of Depression problem – you have pumped all the water there is to get down there. In this case if you are putting down a parallel well for the purpose of increasing water production, the second well needs to physically separated from the first one by a long distance. I’d suggest 30 feet minimum. Nothing at all wrong with even greater separation. Be sure and make the pump connection equidistant between the two wells.
2. You don’t have enough well screen surface. You have plenty of water down there – it just has no way to get in your well pipe in sufficient volume. In this case another well a few feet away is perfectly good solution. Just be sure and don’t intersect the first well when you are drilling. A gravel pack addresses this problem nicely as well.
So, how do you tell which one is your situation? Be guided by the water table. If your water table is way above your well screen it is probably not a cone of depression problem. If your well screen is just below the water table then your problem probably is a cone of depression problem and if you need more flow, put down a second well a good distance away from the first.
3. Yeah, I know I said there were just two possible reasons, but I just realized there is a third. If your well screen just barely sticks out below the bottom of your drill pipe, it is possible to start sucking air from the drillpipe itself. Pull the drillpipe up so the screen starts several feet below the drillpipe to fix this one.
I’ve been scouring the internet on and off for several months ,looking for a tutorial on shallow wells and the best methods. for every question i found an answer to ,i had three more questions. then i found your website and videos.you did a great job explaing this and for the first time since i started my research i actually feel confident enough to try it. a big THANKS !!!!my water company has been gouging me for 12 years and its about to end. when i wash my car,or water the garden,i get charged for sewage even though there is no sewage being used,ive been to several city council meetings to make suggestions as to allow people a fair way of using water that doesnt get into sewage systems but they are making such huge amounts of surplus that they are running the whole town on the water/sewage system,and they have no intention of stopping.we are a tiny little town of 800 people with virtually no crime ,but we have 3 cops with 3 new cop cars. absolutely senseless! ok,back on topic.sorry for the rant. i live in northern louisiana,about 45 miles from the texas line. you wouldnt happen to know how deep the water table is here would you? im looking for water to irigate with,not drink. thanks again for all the work you put into helping others do this for themselves,and allowing others to learn thru your mistakes. im certain i would have made them all had you not done these vides,and the website. Brad
Thanks for your email and your kind comments. I’m sorry, I don’t know the level of your water table. Ask local drillers, local folks with wells, or your county agent. Don’t be surprised if your first try doesn’t work. If you don’t have rock to drill through and you have a relatively high water table, the technique will work. Let me know if I can be of assistance.
Subject: how deep?
Amazing site, in your gravel packs and well screens article and diagram, you show drilling to a second water bearing sand area. How do you know when to finish your well? Is it necessary to find a 2nd band of water?
Thanks! The diagram with the second water bearing sand area was to show how a long gravel pack could provide some insurance against a dry well. Sometimes you find one band of water, sometimes none, sometime several.
Finish the well and put the screen down when:
1. You are well below the local water table and;
2. You are in sand.
Ideally, you will hit a level of sand that is so porous it keeps all the water you put down. None comes up the sides of the pipe. When this happens and you are well below the water table, that is exactly where you want to put your screen. Sometimes it is a bit of trial and error.
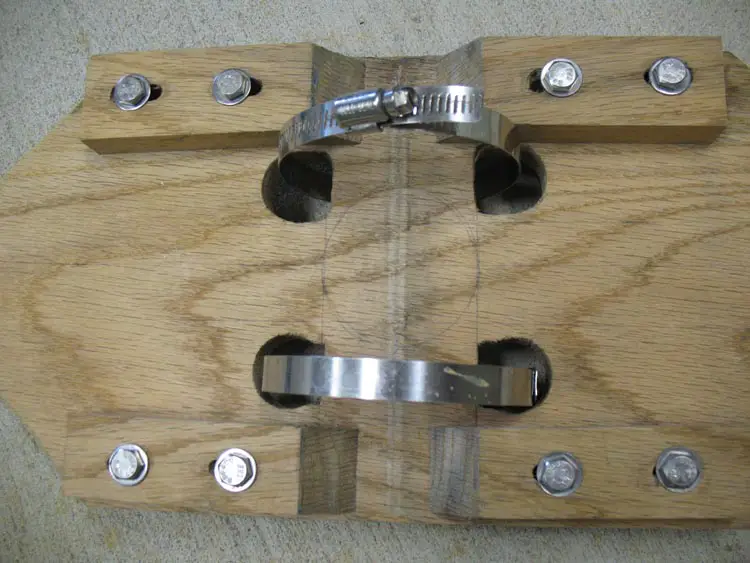
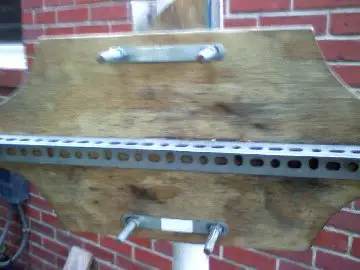
Mike, I have a question about your handle. I know you used hose clamps to the pipe, but in the picture I see some bolts or nuts, what are they for??
In addition to the main piece of the handle I have cut little movable wedges to put up against both sides of the pipe. The bolts are tightened up against the wedges to hold them in place. This permits the same handle to be used for two and three inch pipes. As info, I’m not really happy about my design. It is the third generation of what I consider a mediocre design. It is, however, one heck of a lot better than the earlier ones or vice grips.
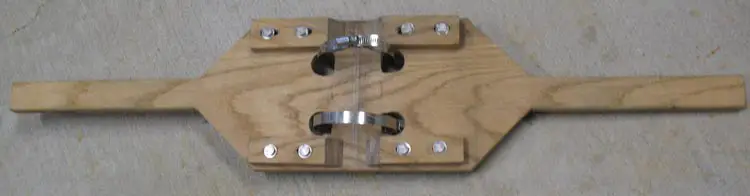
The extra piece of wood on the back side shown below is just so the clamps won’t be bent at such a harsh angle when tightened.
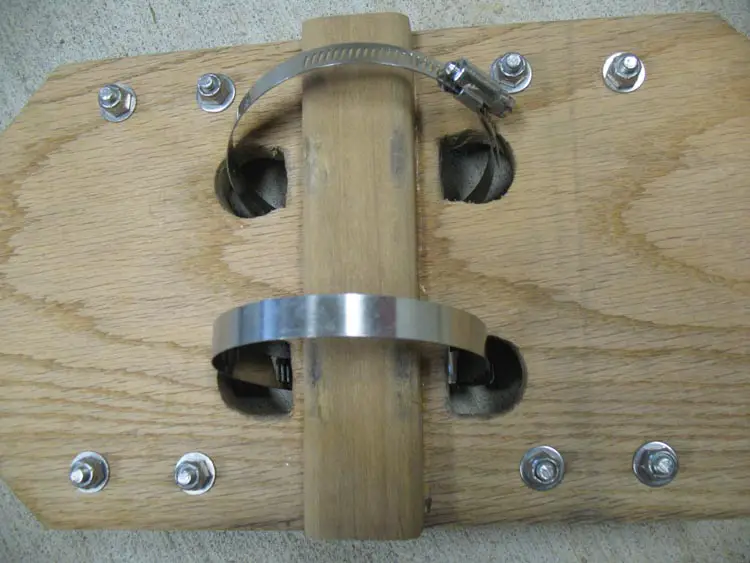
It is made of oak for maximum strength.
I broke an earlier version made of pine.
These pictures only show two hose clamps, butI usually use four hose clamps, two through each set of holes.
The picture below shows the wedges. They can be moved left and right to fit different size pipes.
Thanks for posting your videos on well drilling.i have tried your methods and they work quite well.am having a problem that im hoping you can help me out on.when i get to about 40 feet i hit water.when i take the pipe out to put the filter in the hole it closes and becomes very hard that if i try to push the pvc filter it will break,like pressure in the ground.there water is there but as soon as i take drill out and try to put the filter the hole at the very bottom where the water is closes on me.at about 40 feet once i get the drill past the stage where i hit water,i can put as much pipe as i want to and if i let it go it’ll sink into the hole like it has no bottom.once again thanks for posting your videos,yours truly Hector.
Hector,
When you get to the stage where the pipe will sink into the hole like it has no bottom – THAT is where you want to set the well screen.
40 feet is GREAT!
Make sure you have your 2 inch pipe loose. Make up the full length of your 1.25 inch well screen pipe – in your case with a 40 foot drillhole that will be about 43 or 44 feet.
Then:
1.
Take the drillhead off
2.
Put the wellscreen pipe all the way down through the drill pipe. This should leave about three feet of wellscreen pipe sticking up at the top above the drillpipe.
3. Pull up the 2.00 inch drill pipe while holding the 1.25 inch wellscreen pipe down. After the first few feet, sand should start to collapse a little on the bottom of the wellscreen so the drillpipe can be lifted further without pulling the wellscreen pipe up. Pull the drillpipe up at least 10 feet and it is perfectly fine to pull it all the way out (especially if you want to use it to drill another well).
Mike,
I have a bit of a paradox and I thought you would be the one to ask. My original well is still continuing to work fine, and just for my own information, I used two 5 gallon buckets and a stop watch to determine my gpm. The results were the same on two test; 6 gallons per minute.
After my last correspondence with you, I installed a successful well for my parents. Using the same method, equipment, and approximate depth, their well produces approximately 10 gpm.
Well feeling kinda ripped-off, because their well produced more water than mine, I installed a second well point on my well. This second point is four feet from the first. I connected the two points with a tee connection. I placed a cut-off valve between the first point and the manifold, so I could get a gpm of the second point only. The second point also consistently has 6 gpm.
I then opened the valve and allowed both points to feed the pump evenly. The combined total gpm is 6 gpm. According to the pump’s literature, it is capable of pumping 898 gph. The pump has a 1″ intake line.
At this rate my pump is producing apx 360 gph. My parent’s well is producing apx 600 gph with 1 point. Their well uses the same type pump, pipe, fittings, and approximate depth.
I guess my question is, if my first point produces 6 gpm, and the second point produces 6 gpm, then why is the combined total of points a and b only 6 gpm. I’m puzzled.
Randall
Next was series of suggestions I made to Randall, none of which helped and I told him I simply didn’t know what the problem was. Then I heard back from him….
…I was thinking yesterday – what if my results were flawed? What if the 6 gpm was not what the pump could produce, or the wells could produce, but only what the hose I was using could deliver. I then connected a second hose to a ‘Y’ connection from the pump facet. I ran another test and got 9 gpm.
Randall
GO RANDALL!!!
After i got the 2 inch stuck i tried to use a pipe wrech to turn itthe top blew off againi jumpedlater couldnt find the pipe wrenchso i ran 1 inch down the middle,the 2 inch casing came loose, i sharpened the 2 inch put it back in the hole , little did i know the pipe wrench fell on down when i pulled the 2 inch upthen nothing would go any farther , then i noticed the incide of the 2 inch was scratched up inside , so i ran a 3 in down the holeand it grabbed the pipe wrench (WOW what luck) PICTURE INCLUDEDnow i have put the 3 inch back in the hole and ran into a hard pan at 20 ft .that’s where i am at now,so next i start a 2 inch inside the 3 into get passed the hard pan, look at the pic and you will see a piece of pebble that came up with the pipe wrench its laying below the bottom jaw and the adjuster
Ken in Texas
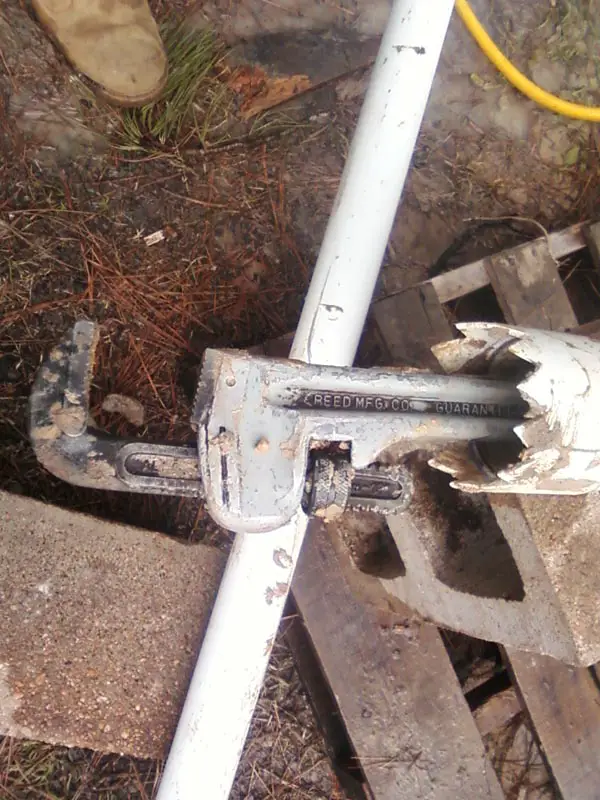
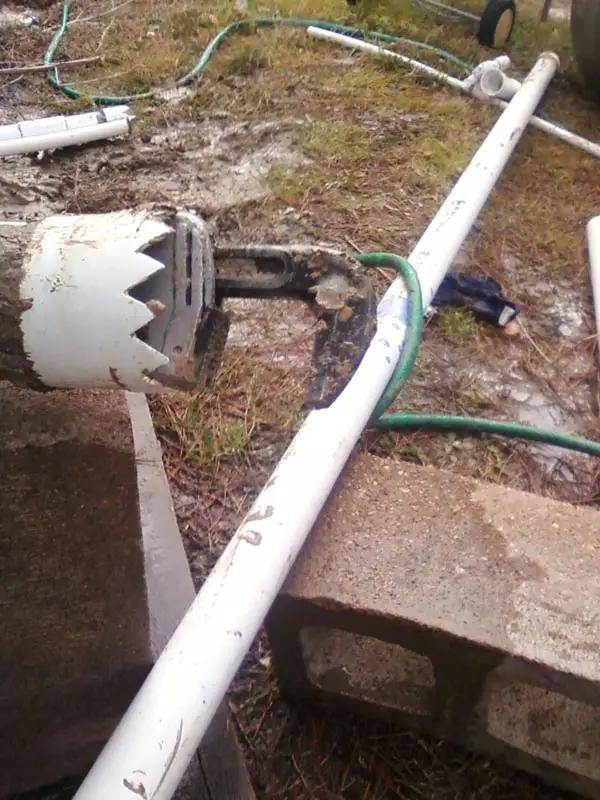
Wow! That was lucky Ken!
Mike – First THANK YOU for your wonderful web site!!! I have already built my well head and drill bit exactly like the new version on your web site! I think I am going to drill using a 3″ pipe to make setting the well screen in the gravel pack a little easier.
I live in South Carolina about 60 miles from the coast. We have a fairly high water table here but I am still thinking of drilling down to 30 or 35 feet to help avoid run off pollutants… maybe I am crazy with this though. I’m looking to irrigate with the well water possibly feed a cold water sink in my shop / painting studio.
I know very little about well pumps. Most shallow well pumps say they work well up to a 25′ depth. If I end up going to 30 or 35′ do I really need to go with a deep water pump? What brand pump have you found to be the best? I’m planning on using a pressure tank with my system. How large a pressure tank should I go with? Maybe a 19 gallon pressure tank?
Thanks for your input and thanks again for all the time you spent making those videos!!! They are absolutely WONDERFUL!
Thanks for your kind words!!
Water can only be sucked up from 25 feet. You can’t suck it more than that if you use a pump powered by a 426 hemi. It is an atmospheric pressure thing. If your water table is, say 15 feet, and you drill a 100 foot well you only need pump the water 15 feet. The water in your well pipe will stand at 15 feet just like the surrounding water.
I don’t know which brand pump is best. Sorry. I understand from the pump experts that the ones sold by the big box stores are not the best.
I was reading the section “About Gravel Packs & Well Screens”. If I’m understanding the section correctly you can just small holes/slits near the bottom of the first section of pipe to make a well screen? Should I do that before or after I fishing drilling the well?
For those people that are asking about finding out how deep the water table in their area is this site may be of some help:
http://www.usgs.gov/ simply type “groundwater” followed by your state in their search bar. Once you are on the page concerning your state select “Groundwater table” under “Real-time data predefined displays”. A listing may not be available for all counties in your state.
That is an interesting site!
What you described will work but it is easier to just use a premade well screen. You put the well screen in after you drill the well.
I have contructed a drill bit head and drill bit from your web site. I dug my well doing the exact techique that you did in the videos. However, I pulled my pip up once it was at 25ft to put a screen on it. Once i went to put the system in the white sand collapsed in the hole we just dug. Pretty depressing. So, i went to ace an got a bailer with rope to re dig the well because it completely caved in. Well i did that an got down 20 ft. I put my cypress plug down in and poped it in with the bailer. Then i stopped for the day.
Next day, I hooked all the plumbin up to my 1.5hp pump and primed the pump. Do i have to prime the well? Should i get a piece that runs in the well line so i can prime it? I hope this works.
Seems as if we had nothing but sand for about 18 ft down. Dark to white sand it seemed. I mean we are on the gulf coast but im about 8 miles up from the water. My neighbor has a system that he runs 8 sections with 6-8 heads per section and never has an issue. I believe he is about 20-25ft. He had his installed.
Anyways let me know what you think.
You can’t pull the 2.00 inch drillpipe up and then take the time to put a screen on it. The hole will collapse. Dig a 25 foot hole with 2.00 inch PVC. Then put a 1.25 inch well screen on enough 1.25 inch PVC to reach 25 feet. For a three foot well screen this means 22 feet of 1.25 inch PVC. Next, quickly pull the water supply off the top of the 2.00 inch drill pipe. Put the 1.25 inch well screen all the way down. Then pull the 2.00 inch pipe all the way out of the ground.
After you attach the pump, you have to prime the pump and the wellpipe. Yes, you need a piece branching off the wellpipe with a valve on it so you can prime the wellpipe when you prime the pump. Some folks have managed to get away without this if they have a high water table or a super pump but it really should be included.
Hello Mike,
I have been following your web page since your information enabled my success. Anyway, after reading the latest posting on the ‘Comments & Questions – Page 2’ section, it seemed to me that the person in South Carolina might not have understood something very important. That being there are two different kinds (sizes) of pipes used in your process: an outside (exterior) pipe used for the drilling (and can subsequently be used as the well casing), and a smaller diameter interior pipe that contains the well point (which is placed inside the larger diameter drilling pipe).
I might not be explaining this as clearly as you can, but based upon my understanding of the way South Carolina’s comments are written, they might have not understood that when the final depth of the well is reached with the drill/casing pipe (2″ – 3″ pipe), then the well point pipe (1.25″ pipe) is inserted into/inside the drill/casing pipe. Then, they proceed to the gravel pack installation process, etc.
You might even want to add photos showing how the interior well point pipe is inserted into the exterior drill/casing pipe. I know you have diagrams and they were very clear to me, but I can see how it could be misunderstood.
I just thought I would offer my two cents.
Thanks again for your information.
Randall
Randall makes a good point. I have gotten the impression from several people who have obviously studied the method presented on this site that they still didn’t understand there were two pipes involved in “drillling” a plain well. I am rehabing a rotator cuff operation right now but as soon as I am able I will add a video showing the plain simple technique that most folks should be using.
The technique in its simplest terms is:
1. With a 2.00 inch drill pipe, wash or “drill” a hole 25 or 30 feet deep depending on how deep you can get it. Keep the water flowing on your two inch pipe until you are ready to do step 2.
2. Make up a length of 1.25 inch pipe with a well screen at what will be the bottom end. It should be the same length as your hole with just a foot or so left over so it will stick out above the ground when put in the hole.
3. Then, turn off the water and remove the water supply fitting from the 2.00 inch drillpipe. Stick the 1.25 inch well screen pipe down the 2.00 inch drillpipe. Once the well screen pipe is all the way down, remove the 2.00 drillpipe.
In my area the well drillers and city records say there is water at 25 feet and at 190 feet. I am told until whoever starts drilling and hits water thats how deep it will be. Do you know any way i can find out myself. I tried devining rods, but not to good. Any suggestions other than not drilling for water?
You might check with your county agent, although drilling really is the only way to tell for sure.
Loved the site. Almost 1a.m before I’ve finished reading/watching everything! When you assembled the well head, you drilled a weep hole. What is it’s purpose? Might have dozed during that explanation.
Glad you liked the site! When you just add another piece of PVC sometimes the water flow is a little hard to get going again. If clay or sand plugges up the bottom of the drillpipe then air gathers at the top and as pressure builds the air compresses and will eventually blow off the top of the drillhead. It is kind of scary first time it happens! If you put a tiny hole in the drillhead for air to escape then this won’t happen. The water that you lose out of the weep hole is not enough to significantly affect drilling and it eliminates a potential problem.
Great site. I was wondering, would it work to put a 2in. sand point down in the 3in. drill pipe? Or is that to big to then pull the 3in pipe out?Thanks,Mark, Daytona Beach, FL
Mark,
Thanks! It would be harder but certainly not impossible. It would result in a significantly better yielding well.
Mike
I’m cutting to the chase, here. Gary and I exchanged half a dozen emails before this. He has discovered a brilliant solution to a problem. He had previously put pea gravel down a hole and then realized he needed to drill further. The pea gravel was in the way. Check out his solution!
Mike,
Last weekend, I attempted to take the bottom of the well from ~18′ to 21′. I tried the tent-peg-bayonet, the 1 1/2″ pipe w/ steel cutter, and also placing a 3/4″ pipe hooked to water hose, down thru the 1 1/2″ pipe.
After using the bayonet for a while, followed be the cutter, I was able to flush some dark silt & fine sand out of the 4″ pipe, but the bottom remained around 17.5 – 18′. Then, I was sure that by placing the 3/4″ pipe down thru the 1 1/2″ pipe that I would certainly be able to flush material up thru the 1 1/2″ pipe. No-go, …not even water would come up thru the 1 1/2″ pipe. No matter how I jigged the two pipes up & down, no water would come up thru the 1 1/2″ pipe. ???
Below is are 2 pic’s of what I tried next. The item I used is a large, thick-walled plastic vitamin bottle. How the top is cut & flared is obvious. The bottom was center drilled with a hole saw and placed on the 1 1/2″ threads, just above the steel cutter. How it works is, I put it at the bottom of the 4″ pipe and jig it up & down rapidly 5-10 times and the let it sit on the bottom for about 5 seconds. The slit-open, cone shaped top catches disturbed sand as it sinks. The bottle holds about 1/2 cup of material. After about following this procedure about 15 times, the bottom of the hole was at 19′. PROGRESS !!!. The first few times the cup came up filled with very coarse sand & a little fine gravel. After that only a very fine sand came up and it was a pinkish/tan color. Unfortunately, after reaching 19′ no matter how many times I emptied the cup full of sand the bottom remained at 19′. Apparently the sand just kept flowing back in. While my wellpoint is 4 foot overall, there are only 3′ of inlet openings. Careful measuring told me that at 19′ the uppermost inlets are 2′ 10″ under the water surface. I decided to fly with it and dropped the wellpoint down the 4″ casing. I hope that 2′ 10″ of water is enough.
With the top slit & flared out, it fills the 4″ pipe. Of course, on the downward thrust the flaps would tend to close upward allowing disturbed sand to pass upward. After jigging it up & down rapidly ( about 1′ ), let it sit on the bottom for about 5 seconds. During that time the slits reopen, filling the 4″ pipe, and catch the falling sand.
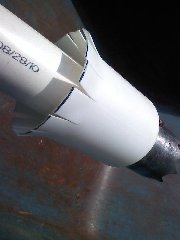
Here is the proof that it actually does worked.
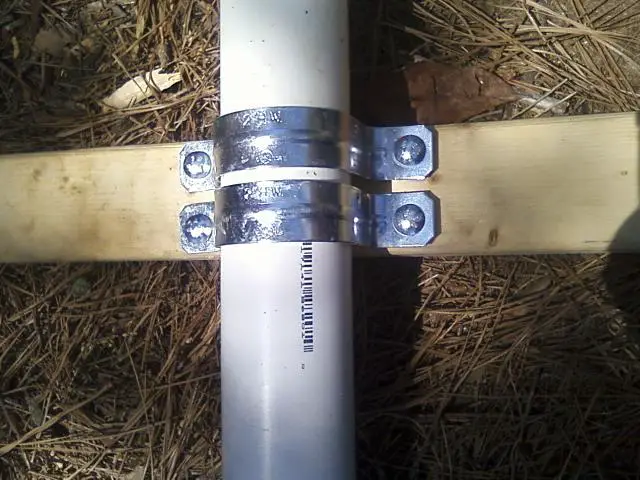
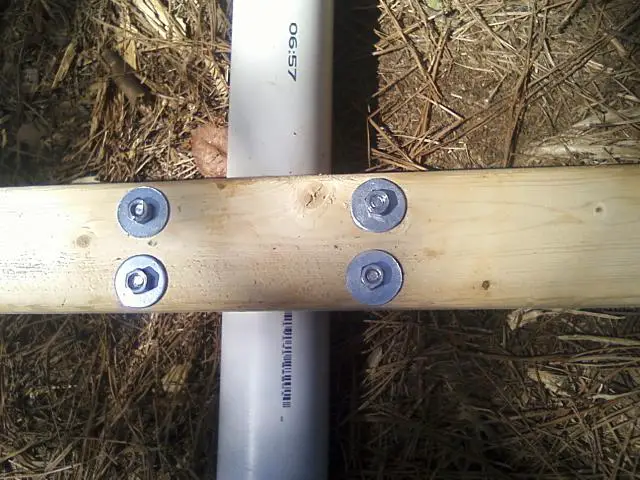
Here are a couple of pic’s of my drill handle. Sorry, the pic’s are a little blurry. My version uses 2 large, steel U clamps, and a piece of aluminum angle on the backside . It worked great! The aluminum angle really grips well. Last Sunday I actually twisted apart one of the PVC glue joints where the 1 1/2″ pipe was glued into a coupling. Luckily it was just below ground level. The second pic shows a piece of steel angle that reinforces the strength of the handle while twisting it.
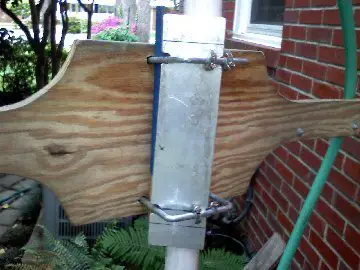
* My old pump was a Sears 1/2 HP, 45 yrs old and needs to be replaced. I went to two stores and neither had a 1/2 HP, but both did have 3/4 HP’s. So I bought a 3/4 HP Utilitech pump at Lowes. Currently I’m designing & building a pump stand, while trying to at least match up the old 1 1/4″ inlet hole thru my brick siding. After that I’ll cut down both the 2″ well pipe and 4″ casing some, try to raise the casing about 5′, and then plumb the well to the pump.
* In removing the old pump it almost seems a miracle that we never had a fire. The two 120 VAC wires at the pump were no more than finger tight, although no burn marks there. The wires between the pump and the wall switch were 16 ga. At the switch, both of the 16 ga wires were loose and one was obviously arcing as it was severely burnt. I wasn’t aware of any of this because the wall was built the pump and a bench covered it all from sight.
* As usual, all thoughts & comments will be appreciated !!!
Tnx,
Gary
All I can say Gary is that is extremely ingenious!
Mike,
Thank you for your website!!! I’ve spent many hours studying various methods for DIY well drilling and your site helped tie it all together.
My methods were unique due to the available equipment, my results were less than desirable with a 46′ dry hole but I had a great time and plan to go at it again.
Some background …
This is in Middle Georgia near the top edge of our coastal plain area.
My research indicated there was only a possibility I would hit water in the 30 to 40 foot range and a better chance in the 50’s and that I would either have to use a 4″ casing for a two pipe jet or submersible or a two inch casing with a packer pump.
I had an old cup auger with a six foot handle that had been discarded by a local septic contractor many years ago. I used that auger to bore a hole, five inches at a time, to get a feel for the soil types involved.
I ended up extending the handle using EMT conduit and boring to 21′ in just a few hours. I found 7′ of damp orange clay, 2′ of very dry white chalk like clay, 4′ of very fine damp sand, 2′ of more dry white clay, and 6′ of damp very fine gray sand. The last few feet were quite a workout in part due to the weight of my extended auger and in part due to the sane falling out of the auger cup as it banged on the sides of the hole.
Armed with my actual soil information and an assortment of tools I came up with a plan.
My tools and equipment included a tractor with a box blade and an old 1HP pool pump with an attached strainer so I dug a mud pit and piped up the pool pump to be my “mud pump”. I piped in my mud pump using 1″ black flex piping normally used for garden water ponds and added a full 3/4″
connection to county water (with two back flow preventer) for priming.
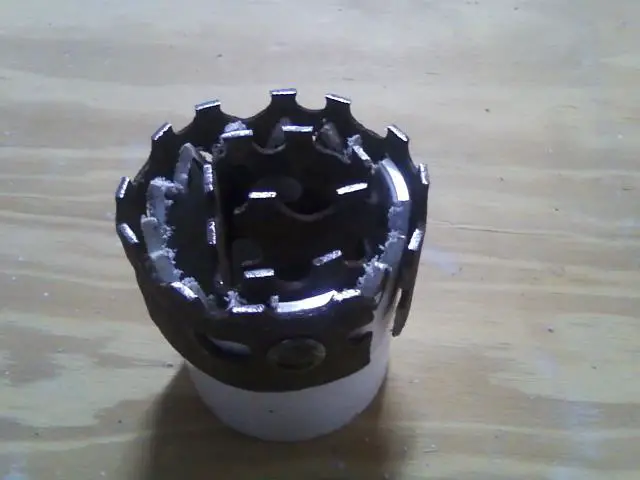
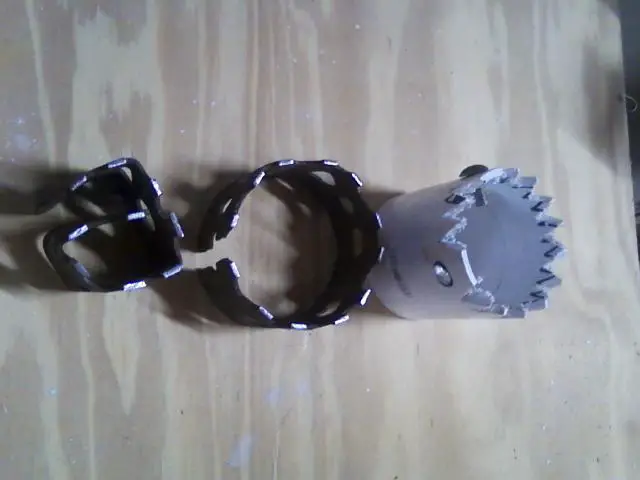
I installed my casing into my augered hole and started drilling. Water was boiling out of the ground around the pipe about four inches high and in moments I had drilled a foot deeper and onto another layer of hard clay. I could tell the plastic teeth on my pipe coupling drill were no match for this soil type so I pulled it out for a little drill point modification.
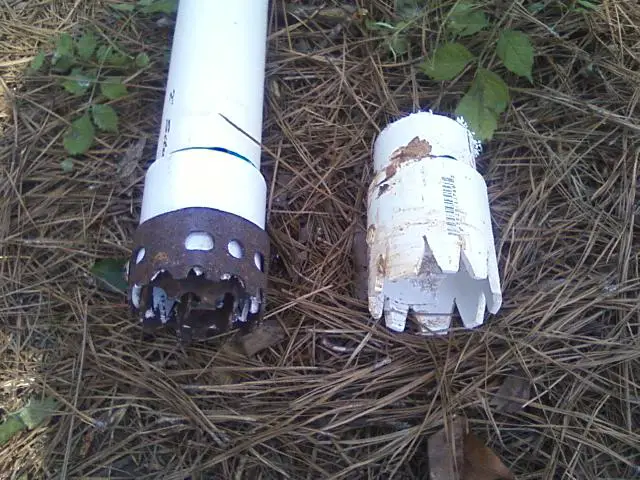
Twenty minutes later I had my metal toothed head finished and headed back down the hole. I used a saws all to rip a section of punched angle along the holes and then used that jagged edge for my teeth. I wrapped the flat metal around the fitting and then added an inside section for “good measure”. I also made a new handle using two 2″ conduit clamps and 1/4″ carriage bolts. I included pictures of the head and the handle.
Both worked great, were fast to build and were cheap. A note on that drill head… it was pure luck that my bolts were on one side. That allowed the metal to bend a little and fold under the pipe, releasing the head from the underside of some hidden hard object (rock?) as I pulled on the riser with the rear end lift of the tractor. More on that later.
It seems reasonable that any water will be on top of one of these clay layers, so every time I hit a layer of hard clay I stopped, pulled the pipe a few feet, waited for water to settle out and checked for water. I could have easily drilled this in four hours but I could not determine how to know if I hit water.
After I got started I drilled down to 46′ and stopped at the top of another layer of hard clay. Daylight was about gone and I needed to pull my pipe for another day. The first four feet were easy with the water on. At 42′ (on the way down) I had felt something very hard and the drill head had just worked down one side of it. Not so luck on the way up. The top of the metal cutter got hung under the edge of something just about the time some sand settled around the area. A quick dash for the tractor and another hour of tugging and twisting and the pipe was out.
THANK YOU for insisting on primer! I determined I would either break the pipe off or pull it out. There were times the front wheels of the large tractor were off the ground and the pipe and joints held together. I used Purple primer and Blue wet/dry glue.
I never checked the flow rate of my mud pump but the 16′ thick sand layer at the bottom of this hole cleared in about 45 minutes. I was worried that I may be going too fast but the hole was clear and the pipe loose when all was finished. That is until I pulled out a few feet and got hung under that rock.
What have I learned as most important?
#1 Use metal teeth and lots of water
#2 Use a big mud pit to keep sand out of your pump
#3 It’s a good thing I’m not thirsty and waiting for this water
#4 A drill head riding a two inch wide column of water is an amazing site when viewed from six inches away. I swapped over to couplings and glued the drill cap in place so I could plug the vent hole and not take an extra shower. I would lift the pipe with the hole open the close it off with my finger as I pushed the pipe back down.
#5 Good help is hard to find! Mine just swam around in the mud pit.
What’s next?
See whats under that next layer of clay
Go for 4″ pipe to water hoping that’s under 60′ or so. (Find a second pool pump)
A local driller said they used these kaolin layers as “local mud”
instead of drillers mud. I believe that is my largest unknown besides of course “Is there any water down there?”
Thanks again!!
Bill
Bill, that is one amazing and heartbreaking story. Quite a herculean effort! I’m sorry you didn’t find water bearing sand. You obviously already know this but be sure and use some kind of driller’s mud when you continue. I’m surprised the pool pump stood up to pumping all that mud. If you can find a trash pump anywhere?… Good luck and keep us posted!
Mike
Hi Mike,
Love your Info about drilling wells! I am nearly ready to attempt digging my own. I am going to try digging (3) 25 foot wells and connect them together like you mentioned.
1. Something maybe you can help me understand–what is done with the space between the 2″ Casing and the 1 1/4″ suction line where the 2″ casing stops above ground and the 1 1/4″ starts towards the pump? Is this space left open or sealed shut? Can this area be underground or does the well casing have to come up above ground?
2. Do you know how to treat ferrous Iron in the well water? Here in Jacksonville Florida I noticed a couple neighbors have orange driveways and yards due to iron in the well water. Can this be treated fairly easily? I am on city water but want to dig the well for my sprinkler system only. I don’t want to do it if the water is full of Iron ferrous unless I can treat it.
3. Do you have more detailed photos of how the well looks at ground level and how the well screen is piped and finished coming out of the casing (etc…).
4. Do you use regular 10′ PVC well screening with a well point on your wells? What do you recommend using for this.
Any help would be greatly appreciated,
Randy
Randy,
The 2.00 inch casing ideally should be pulled out of the ground. Then the well should be sealed with bentonite clay or cement to avoid groundwater contamination of the aquifer. If you can’t get the 2.00 inch drillpipe out of the ground, seal the space between the two pipes. for the top portion of the well. Say you drill 20 feet with a two inch pipe and then put a 1.25 inch pipe down another 10 feet. Seal the area between the two pipes for the top 20 feet.
I have iron in my water and I have a 200 foot well. I have no idea how to avoid it or what to do about it other than put Rust Off from Lowes on my driveway whenever it gets to looking too horrible.
I don’t have any more detailed photos than I posted. Sorry.
I use a five foot screen generally but if you are really deep (35′) with a high standing water level (10′) I see no harm in a 10 foot screen. You want to avoid the top of your screen being under the standing water level when you are pumping.
Mike
Dear Michael,
I stumbled across your website by chance and could not believe the incredible amount of useful information and detail you have put into this. Thank you very much!
Key issue that I have come across is that no one seems to carry this Brady Well Point Installation kit any longer and I was interested in knowing if you were familiar with any distributors whom may still have this part for sale? I could fabricate one from single components if I have to, but would prefer to simply buy the real thing.
Any information that you could possibly provide would be greatly appreciated.
Thank you again ,
Dennis
Plymouth MI
Dennis,
Thanks for the complement!
My Lowes and Home Depot no longer carry it either. No big deal because a fabricated one is significantly better anyway. The Brady Kit had the same design flaw my first fabricated one had. Two 3/4 inch pipes feeding into one 3/4 inch pipe restricts the water flow. Adequate water flow is absolutely critical. They need to feed into a bigger pipe, preferably at least 1.25 inch.
Mike
Hey Mike,
What do you mean avoid the top of screen from being under the standing water level when pumping? Okay Mike, I keep hearing all kinda’ hype about pump makers–what manufacturer would you recommend? I seem like Sta-rite, Goulds, and Myers are the front runners for a jet pump like I would need. I would like to hear you opinion since you have done this a lot. What screens do you use and do you buy them at Home Depot or Lowes?
Did you dig your 200′ well yourself? A well that deep must have been dug buy a machine….
Randy
Randy,
That particular well was dug by a real well driller. Speaking of which – a real well driller was kind enough to allow me to post his comments on my website. Please see “from a REAL well driller” on this site. I don’t know pumps. He does. He sells pumps. Good pumps that will last a long time. Get in contact with him to find out what kind of pump you need.
Also, check local regulations before drilling a well.
The top of screen thing – Say your standing water level is at 15 feet. That means if you put a hole in the ground deeper than 15 feet then water will stand at 15 feet. Water flows underground just like it does above ground. If that hole is 20 feet deep and you start pumping, something called a “cone of depression” forms in the groundwater with the lowest point where the bottom of the wellpipe is – where the wellscreen is. If your standing water is 15 feet and your well is only 20 feet deep, when you start pumping you will quickly pump all the water out and be sucking air through the top of the wellscreen. So, you need your well screen to be way under the standing water level. Please read the “GROUNDWATER” section on the site.
Mike
Don’t I need to drill my well down into an aquifer?
The type wells that this technique produces are called “shallow wells” because they are drilled only down to reach the standing water level. This water is perfectly good for lawn watering and irrigation. Aquifers, which are typically much deeper are ideal for potable (drinking) water but they require a much more expensive drill rig to reach. If you need drinking water from an aquifer, hire a real driller. If you want to water your lawn or irrigate your garden without paying the local utility an arm and a leg, these shallow wells are ideal.
Is the water from shallow wells safe to drink?
Sometimes it is and sometimes it isn’t. In response to complaints from concerned folks I have posted warnings on the site to get the water tested before drinking. Some folks say you can’t. I got an email from a driller who insisted most shallow wells are safe to drink from. I don’t know of a scientific survey on the subject but the bottom line is – don’t drink from a shallow well without getting it tested first. Even then, it would be a good idea to get it tested periodically.
Would you think if the three inch well was was widened could you pull the 3inch out and put a 6″ pipe down the well? Or would it just collapse in on itself?
If you really want to do it (and it will definitely increase well output), Here’s how. First drill a two inch hole to whatever depth you need. You can’t go past about 35 feet in most places. Then put a three inch pipe over it and drill to depth again. Pull the two inch pipe out. A four inch pipe won’t go over the three inch so you have to move up to five or six inch. Drill again to depth. I don’t know if the six will fit over the five. You might have to pull the five out and put the six over the three and drill to depth again. Then pull the three inch out Now you have a 35 foot hole six inches in diameter but the six inch pipe is still in. I’m assuming you want to put a four inch screen down there. If you have a way of getting the six inch pipe out of the ground just put the four inch wellscreen down and pull the six inch pipe up. I doubt you can do that but if you can, that is the best plan.
More practically –
Get a four inch drillpipe and put it down through the six inch pipe and go down ten feet below the bottom of the six inch pipe. Keep washing at that same level for quite a while to make as big of hole down there as possible.
Then take the four inch drill out and cut it off square and add the well screen on the bottom. Put it back down and wash it down as far as you can. The hole at the bottom will have collapsed some while you were pulling the four inch out and putting the well screen on. Wash it down as far as you can.
Some four inch well screens have trapped balls at the bottom so you can wash as you put them down. Try to get one of those.
another strategy – When you get your six inch pipe down there put a four inch drill pipe through it and wash a huge hole. Get it as wide below the six inch piece as possible. Then pull the water connnection off the top and put pea gravel down through the four inch piece up to the six inch piece. Pull the four inch piece out and put a check valve on the bottom and attach a pump.
This is all a heck of a lot of work. If you just want more flow, a MUCH easier strategy is to simply put down multiple 1.25 inch well points. Connect them in parallel to a pump and you are ready to go.
Hi Mike,
I am attempting to drill a well for watering my lawn and garden.
Thankfully I’ve happened to find your site. It’s the most comprehensive
source of well drilling information I’ve ever come across.
I live in Charleston, SC and have heard that the water table in this
area is around 15ft. While drilling I’ve encountered several layers of
red clay and some sort of very hard stuff that washes up white and very
fine, possibly what gray clay looks like when it gets broken down, and
some very coarse sand (it looks like the water bearing sand from your
video) that I hit around 13ft after going through 2ft of clay. I’m
currently down to 19ft and have hit another hard layer. This layer seems
very solid, almost like rock, but we shouldn’t have much in the way of
rock this close to the coast especially considering how flat this area is.
I have not had much luck making it through this layer (stuck the pipe
and a fitting broke as I attempted to force it out on my first try) and
was wondering if it is necessary to break through this layer.
Also, I was wondering if it is normal for the surface to cave in while
drilling. I split my drilling up over two days and both times I’ve
tried, the next morning when I come out the soil will have collapsed
about 1ft below the surface leaving a large cavity. After a couple hours
of drilling on day two, the top collapses and I’m left with a 3-4ft
diameter hole and all the cuttings get stuck in the hole and never
really flush to the surface. I’m pretty sure this contributed to the
first pipe getting stuck. As soon as the cave-in happened I lost 90% of
my water flow and was never able to get it back even after lifting the
pipe all the way back out and trying to start from the top to clear the
debris.
Wow, this has turned into a novel. Sorry about that. Any help or advice
you can offer is much appreciated.
v/r,
Sean
Sean,
Thanks! To try to get through the hard layer put a 2 inch galvanized coupling on the end of your drillpipe. Cut teeth in it like the PVC. Then drill for a few hours keeping close track of any progress. More than likely you are in very hard clay. It can feel like rock!
At 19 feet you may possibly be deep enough. We need to know what your standing water level is. When you get down to 19 feet again, put a 1.25 inch wellscreen pipe with inside couplings down through your 2.0 inch pipe and pull the 2.0 inch pipe out of the ground. Leave it that way for a day and then come back and drop a string with a weight on the end and measure how far down your standing water level is. If it is 9 feet or higher, I’d just use the well as it is. If you need more output, put down more 19 foot wells and connect them in parallel.
Regarding your cave in at the top: That big of a cave in at the top is unusual but only because most places have topsoil as a top layer. I’m assuming you have very sandy soil. If so, the cave in at the top is normal. When the cave in occurs on day two and your flow to the top slows down dramatically, take the drillpipe out and start drilling again from the top.
Mike
Hi Mike and great site. I don’t know if you are still answering questions but I have a problem I don’t understand. When I moved in this house a while back there was already a well there. I live in Hampton, Va and you can hit water between 13 to 25 foot. The well that was there had a huge amount of iron in the water. So much it would turn my grass orange. The well point was 80% plugged so I pulled it and went down 60 foot and had great water supply but again huge amount of iron. My neighbor is down 13 foot and has great water. No signs of iron what so ever. His well is about 250 yards from mine. I decided this year to go to the back of the yard and went down 45 foot and hit nothing but gray crap. Decide to move to the far left side of the house and hit water around 22 foot. I washed it down with inch and a quarter PVC but when I put the PVC well point I have been unable to get it to go down to where I hit water at. When I washed down the well in the back of the yard I had a stainless steel point connected to inch and a quarter PVC. I left the SS point in the ground because I was unable to pull it. Anyway you got any suggestions to what I can go to get the new location to go down any further.
Mike
Mike,
I don’t know what to tell you. My well is 200 feet and I have iron in my water too. I can tell you how to get that stainless steel wellpoint out of the ground though. I’m assuming it is 1.25 inch point. Put a 2 inch piece of PVC with serrated edges on the bottom and wash it down over the 1.25 inch piece. Measure carefully and only go as deep as the wellpoint. When you get to the depth of the wellpoint, take out the drillpipe and you will be able (for a minute or two!) pull the wellpoint up.
Mike
gday mate,
just came across your website, very happy with the information i have seen. can you clarify one thing for me please. with your PVC drill pipe you have water in and water out. how can the water come up if there is water going down? i can see it works for you but i just cant figure it out. im doing one at home, using a 100mm (4in) casing pipe and using 90mm drill bits, im down about 4 meters but im pulling up sand but not getting any deeper. i have almost 4 feet of water at the bottom but im sure it isnt enough. any help would be great.
thanks a lot!
matt
Matt,
Water is flowing into the drill pipe from the top. In the case of two hoses the water comes from the hoses. In the case of a mud pump, the water is pumped in by the pump into the top of the drill pipe. The drill bit has a hole in it so water can get out when it reaches the bottom of the drill pipe. The cuttings from the bottom of the hole are washed back up to the surface on the outside of the drill pipe. The space between the drill pipe and the earth is called the “annular space.” It is in this annular space that the cuttings flow back up to the surface of the ground.
Mike