You can’t just put a pipe down in the ground and expect to have a functioning well. It will work but the water production will be extremely poor because the water has only one way to get into the pipe – the one hole at the very bottom.
The end of a piece of two inch PVC pipe simply does not have enough surface area for water to flow from water bearing sand into the pipe at a rate sufficient for any practical use.
A bigger surface area is necessary for water to seep from the water bearing sand into the well stem. The most common way to accomplish this is with a well screen. Before you try the gravel pack techniques shown below, try a simple well screen.
A gravel pack is a way to increase the surface area you are drawing well from and, in turn, increase your well’s production. Gravel packs may be used by themselves or in combination with a well screen.
During the drilling process you have temporarily evacuated the sand from a small area at the bottom of the well. If you don’t take up this space with something, the sand will slowly move back in the space so it is tight around the bottom of the well pipe. By pouring pea gravel into this space, you can permanently hold the sand away and water can seep into the gravel pack from all sides and the bottom of the gravel pack. The result is a much more productive well, i.e. a pump will be able to pump more water from it.
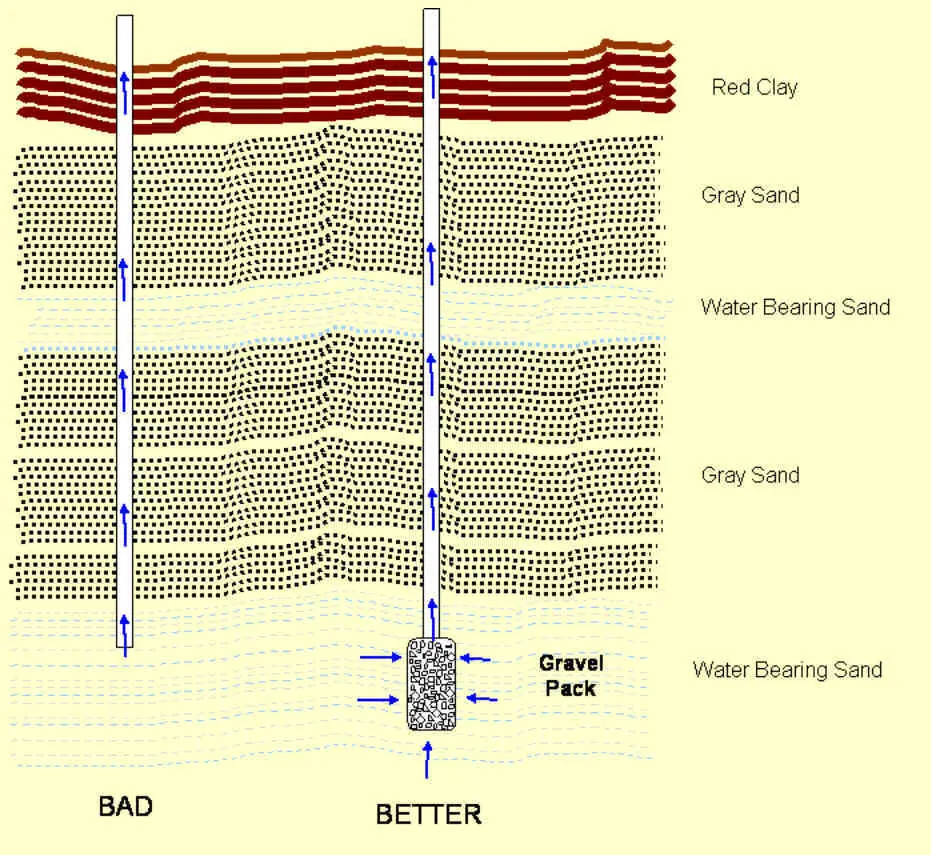
Take a look at the diagram below.

On the left in the diagram above is a simple pipe running from above the ground to the water bearing sand. Water will get in this pipe and can be pumped out but the flow will be excruciatingly slow! On the right above is a better way to do it. Again we have a pipe running from above the ground to the water bearing sand but there is also a gravel pack at the bottom of the pipe. This gravel pack provides a much bigger sand surface area for the water to enter. Water travels much easier and faster through gravel than it does through sand.
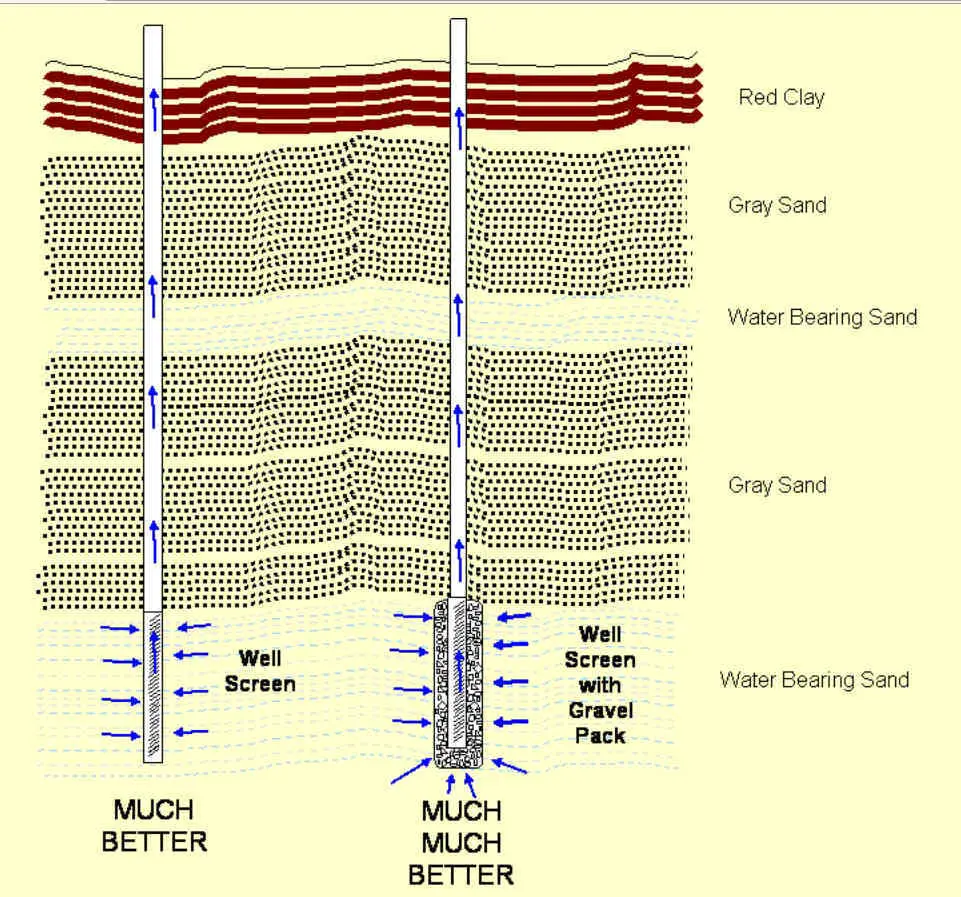
Now take a look at the two wells below. They are both improvements over the two wells shown above.

Before I go any further I want you to pay particular attention to the above arrangement on the left. This is how at least 90% of wells are set up and they work just fine. This is how you should first set up yours. If this fails, try some of the methods using both a gravel pack and a well screen.
The well on the left in the diagram above shows a well screen at the bottom of the well. A well screen is a piece of PVC pipe with hundreds of very small slits cut in it to allow water to enter. You would probably be surprised as how efficient they are. Another advantage of the well screen is its length. If any portion of the well screen is in water bearing sand, water will be able to get into the well casing to be pumped out. On the right is a setup that improves on the well screen. A gravel pack around the well screen provides the advantages of both a well pack and a well screen and will typically result in a very productive well. It provides more surface area for the water to enter from the surrounding sand.
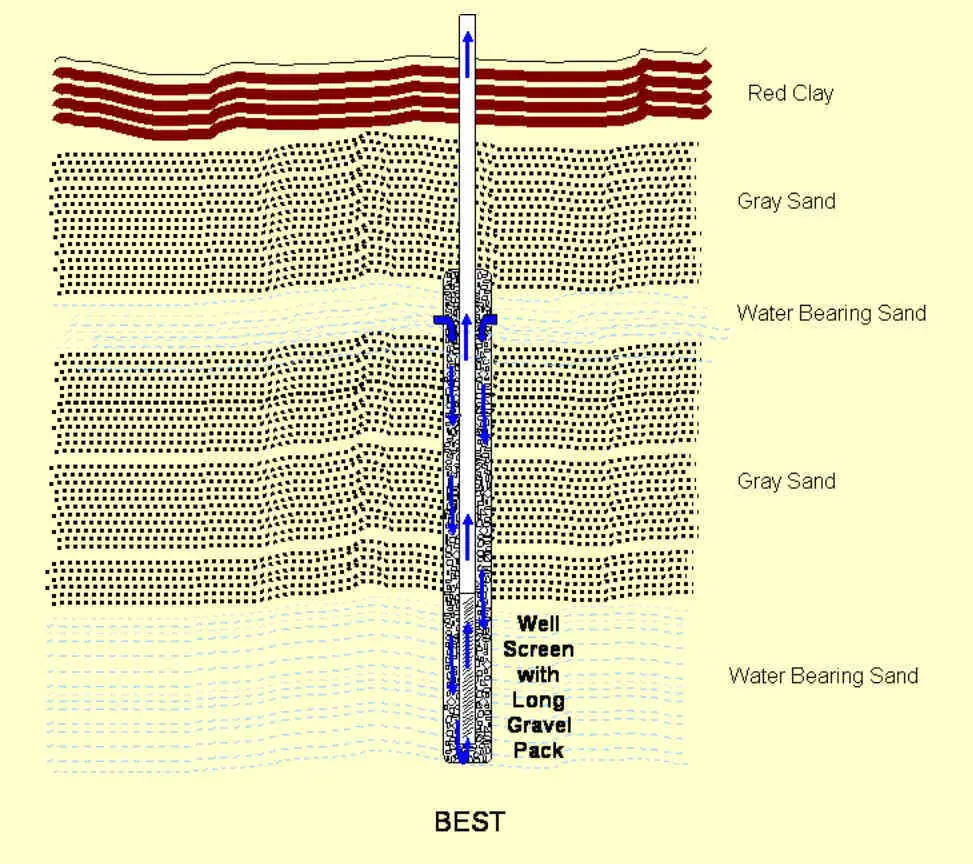
And finally, the best of all is shown below. This includes a well screen and a long gravel pack that extends up way past the screen. Using this protocol provides a bit of insurance against setting the well screen at the wrong level.

This is arguably overkill in many applications but if you go through several small areas of water bearing sand when you are drilling and you don’t have a lot of confidence in what level you should put your well screen at, this is the key. This setup places the well screen at the bottom of the hole but includes a gravel pack so long that it covers multiple layers of water bearing sand. If the well screen is not lined up with water bearing sand the well will still work fine. If other words, if you inadvertently place the well screen in a thick layer of clay, you will still have a functioning well! The water will go down from the water bearing sand through the gravel pack to the bottom of the well casing and then back up.
 drillyourownwell.com